What is a plant? How is a plant associated with a storage location? These are the questions we will answer in this post. I will also show you how to create them in the SAP software.
Plant
So let’s come back to our example from our previous blog about company creation and company code creation. We used the Volkswagen Group as our example. The Volkswagen Group manufactures automobiles, so to manufacture them they need a production plant, right? This is exactly what a plant is in layman’s terms.
Let’s see how SAP defines a plant: It is defined as a place where materials are produced, goods are received and issued, inventory is managed, and production planning is performed. If all of these activities are carried out, then it is a plant.
Let me give you a real-world example.
| PLANT | DESCRIPTION |
|---|---|
| MD01 | Madrid assembly plant |
| BCN1 | Barcelona parts warehouse |
| VAL1 | Valencia engine factory |
All these are examples of plants. Each plant is a separate logistical unit in SAP. This means that SAP keeps track of stock, production, and material movements per plant.
Storage Location
Now that we know the gist of what a plant is, let’s take a look at storage locations. This is very easy and basic. If you want to do production, you need to store the raw materials required for production somewhere, right? This place is called a storage location in SAP.
So in our earlier example, I chose 3 plants, but I will use just one plant here. Let’s take the Madrid assembly plant.
| STORAGE LOCATION | DESCRIPTION |
|---|---|
| RM01 | Raw materials warehouse |
| FG01 | Finished goods warehouse |
| QA01 | Quality inspection area |
So imagine the Madrid assembly plant receives raw materials and finished goods like engines, tyres, paint, windows, etc. These need to be stored somewhere. If they are raw materials for manufacturing, we store them in RM01. If they are finished goods, we store them in FG01. Likewise, we also perform quality inspections, and some materials may be stored temporarily for inspection in QA01.
In summary, a plant can have multiple storage locations assigned to it. However, each storage location can only be assigned to one plant.
Creating a Plant in SAP
This is straightforward and also very similar to how we created the company code in a previous blog blog. We have two ways to access the plant creation screen. The t-code for plant creation is OX10. The SAP reference IMG path is: Enterprise Structure → Definition → Logistics General → Define, Copy, Delete, Check Plant.
So I’m going to use the t-code OX10. It will take you to this screen.
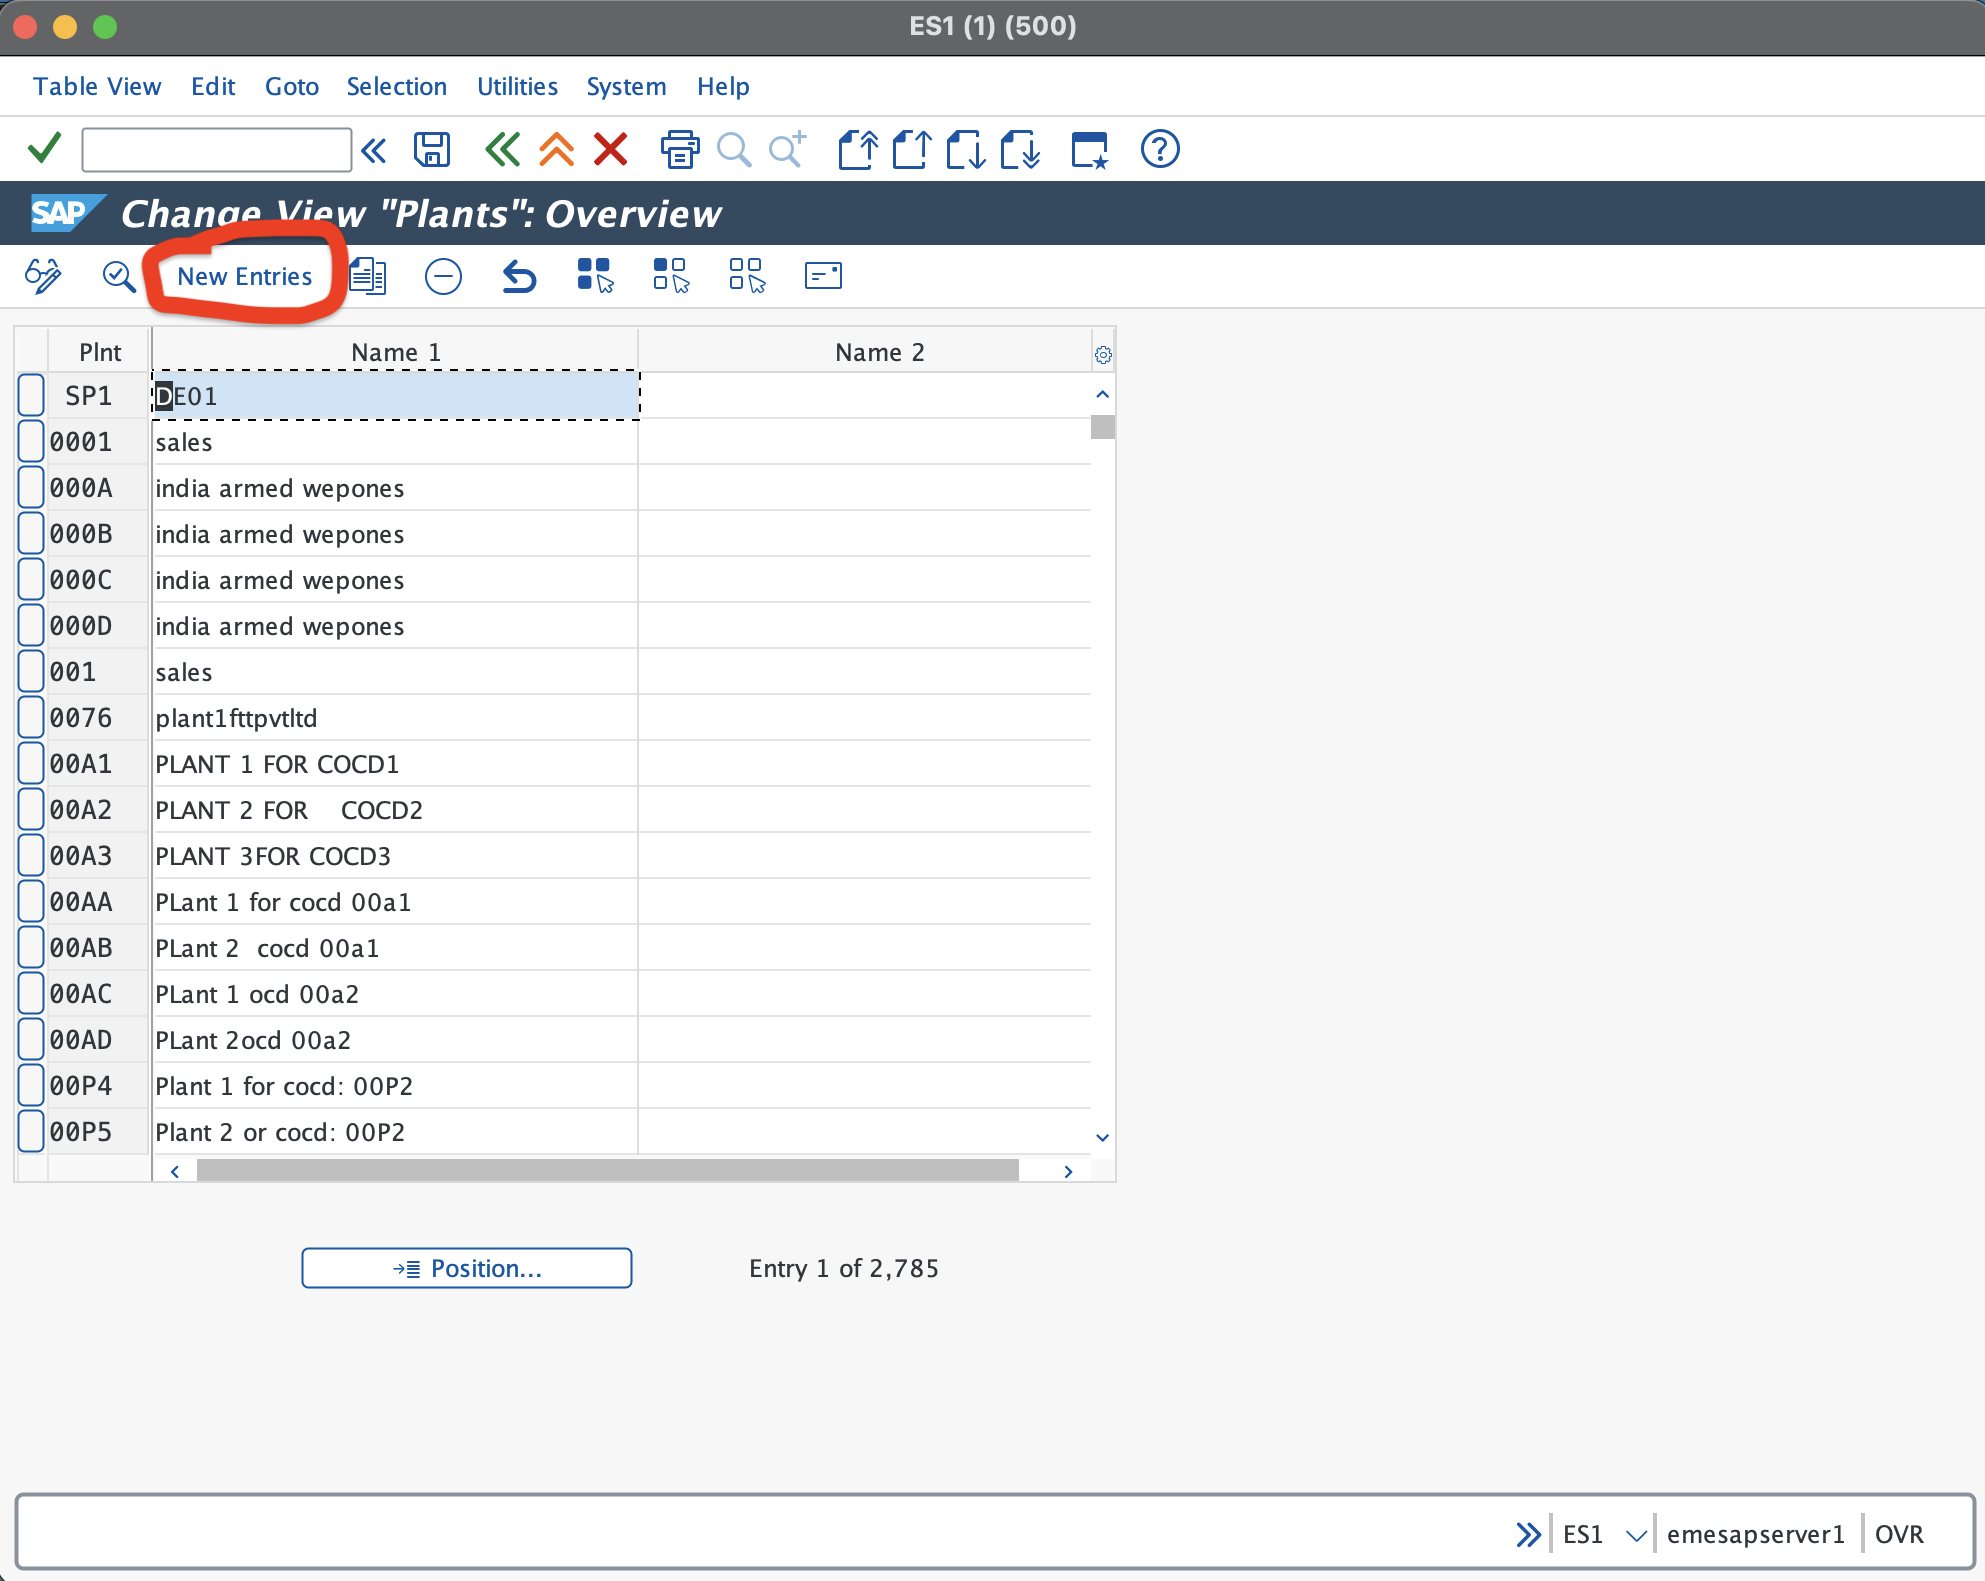
Once you are on this screen, click on the New Entries button. You will then arrive at this screen.
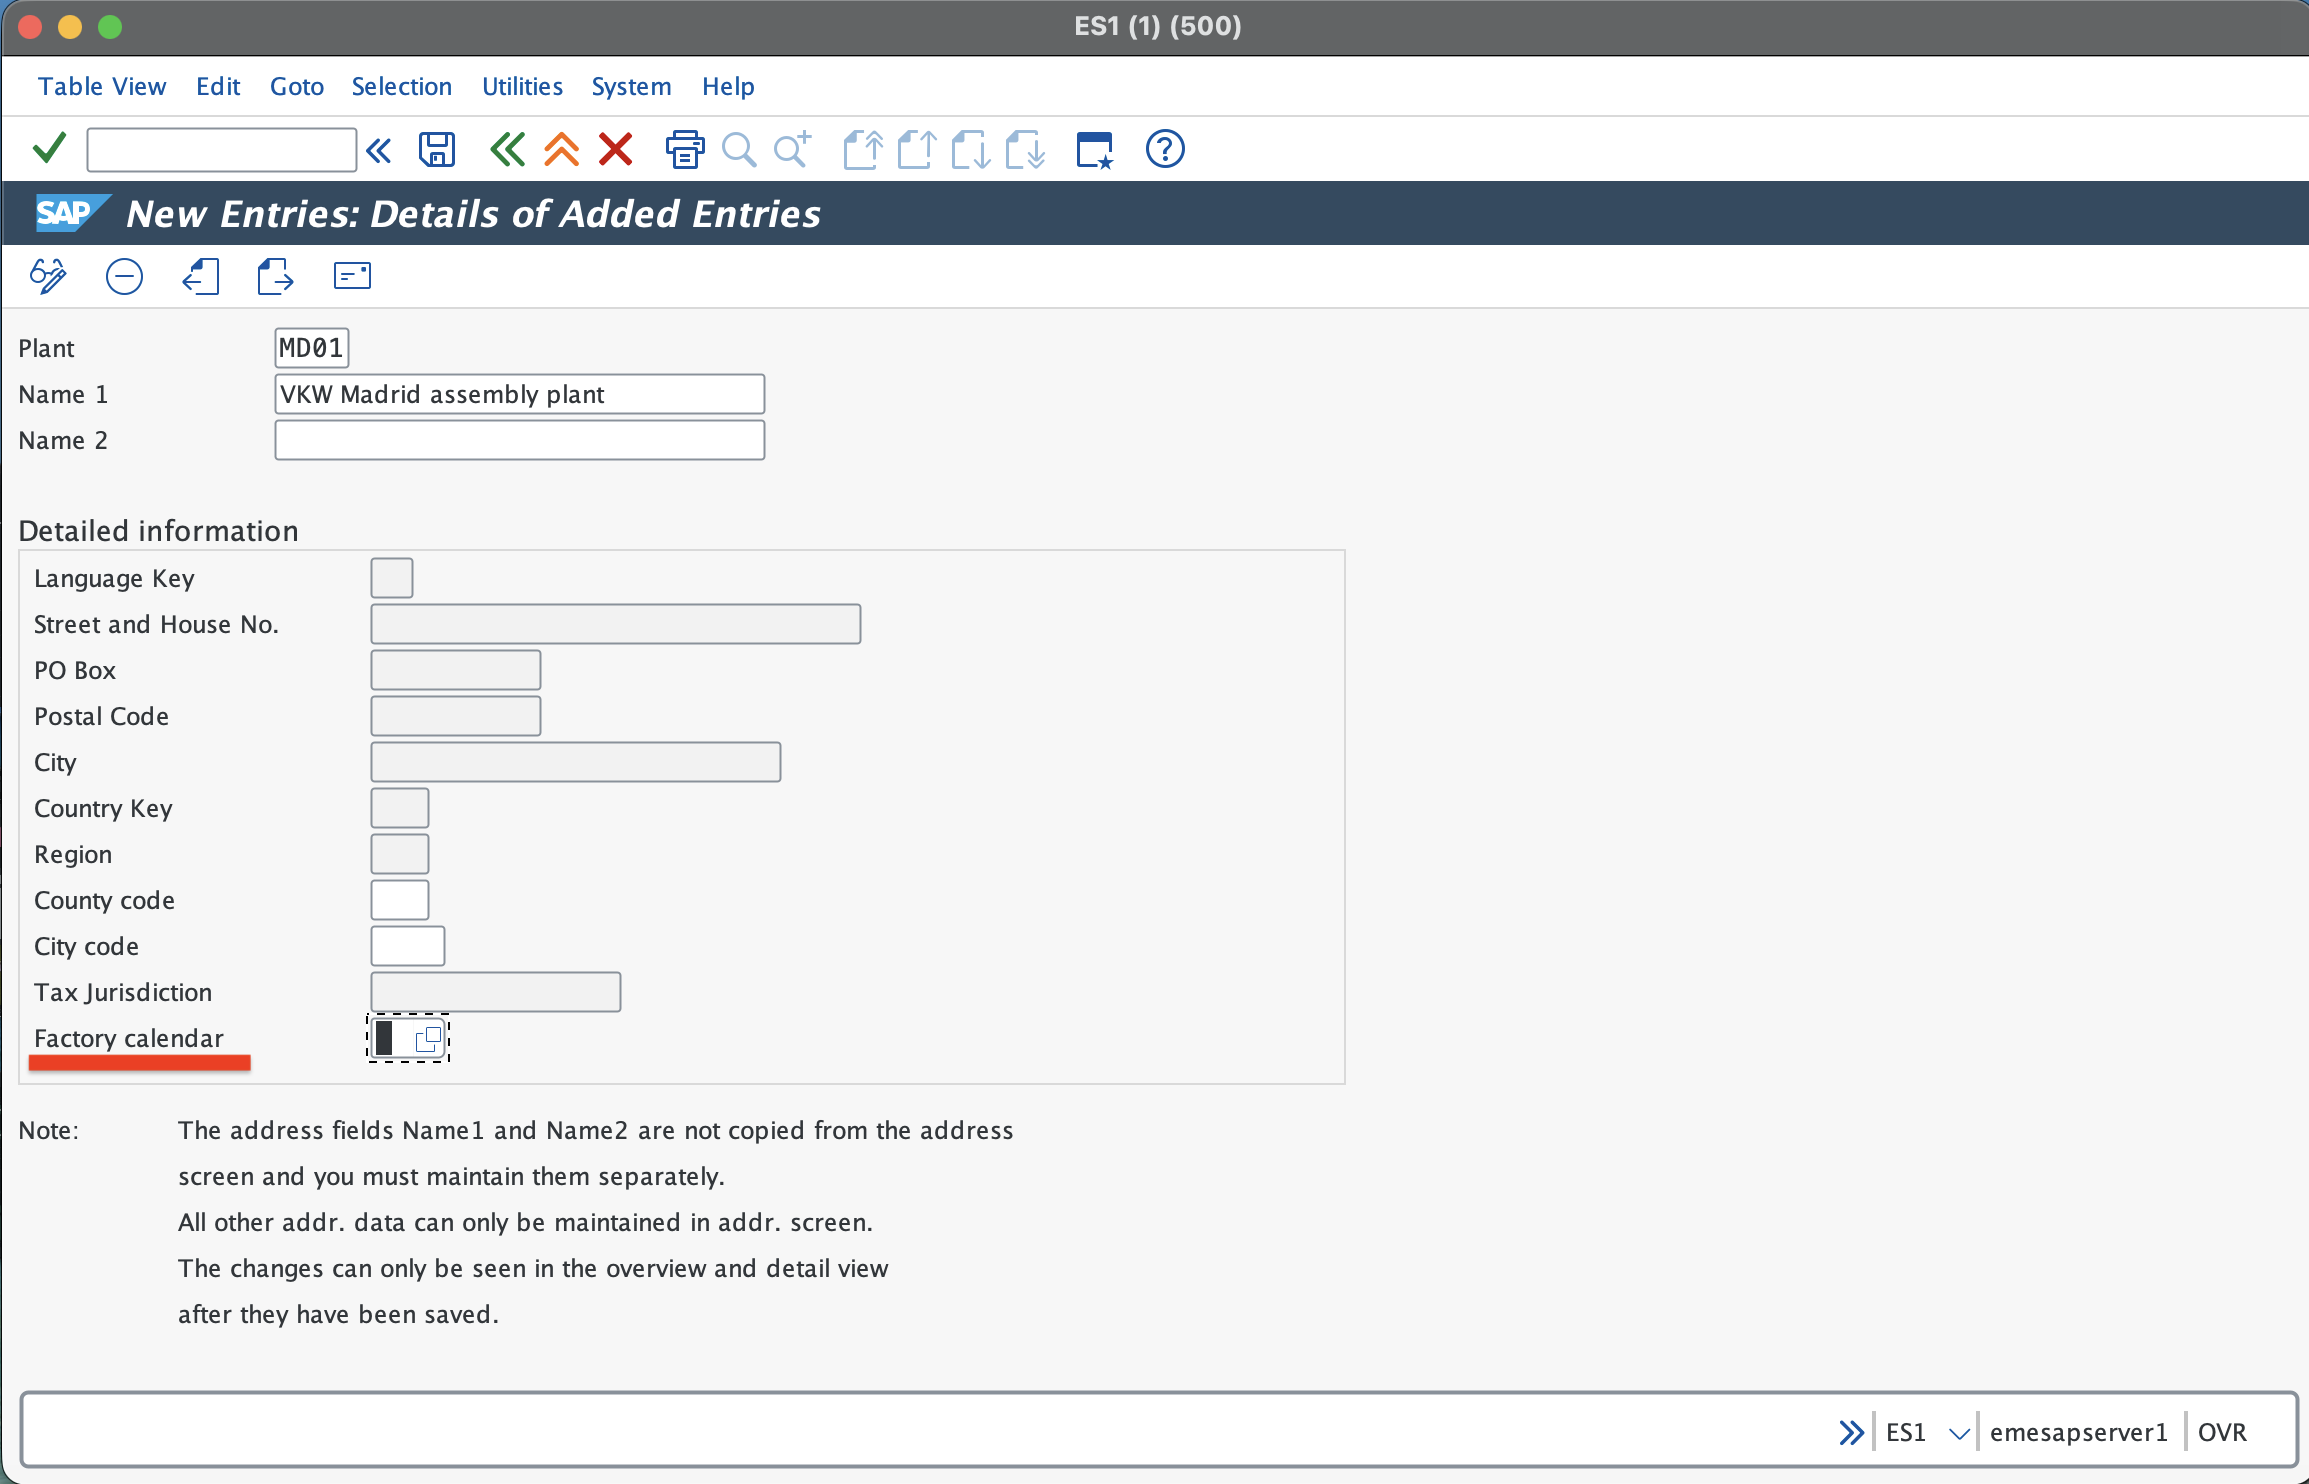
Here I have marked the factory calendar because you need to create one. For the sake of our example, I will create one. I will show you the steps, but what a factory calendar means is the number of actual working days where the factory is in operation. So you must consider public holidays. This means that before creating a factory calendar, we also need to create a public holiday calendar.
Creating a Factory Calendar in SAP
The t-code for this is SCAL, but for some reason it is not working in my training server. So we will go through the SAP reference IMG: Time Management → Work Schedules → Define Public Holiday Classes.
Once you are in, you will see this screen.
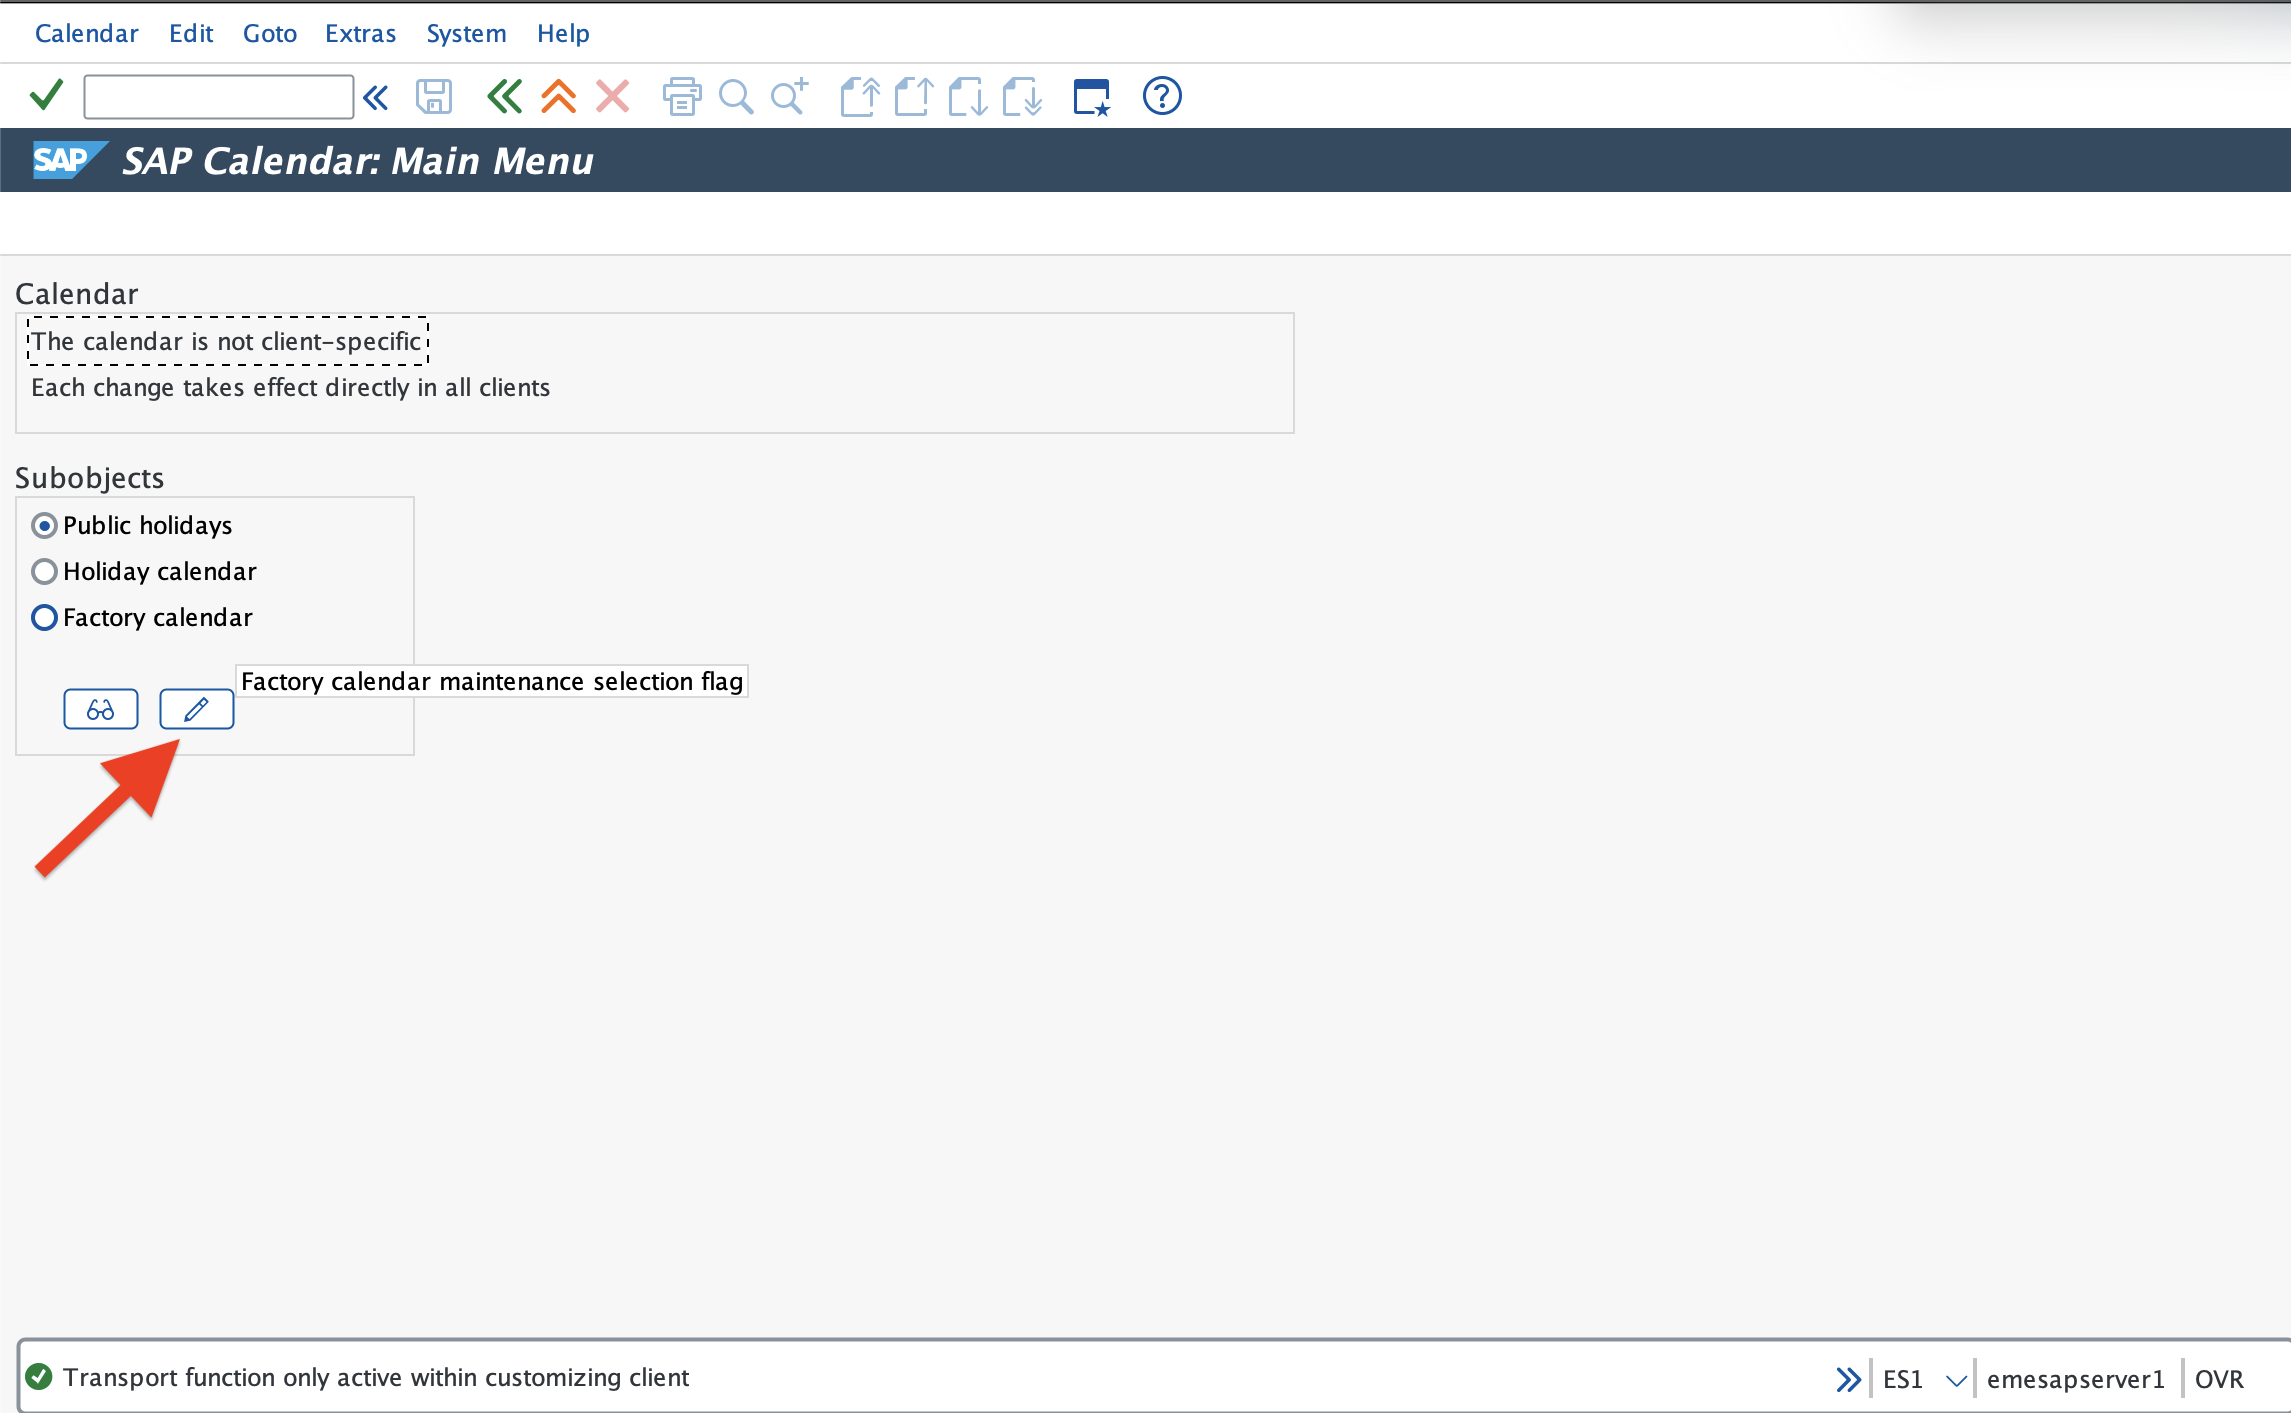
Just select Public Holiday and click on the button shown in the image.
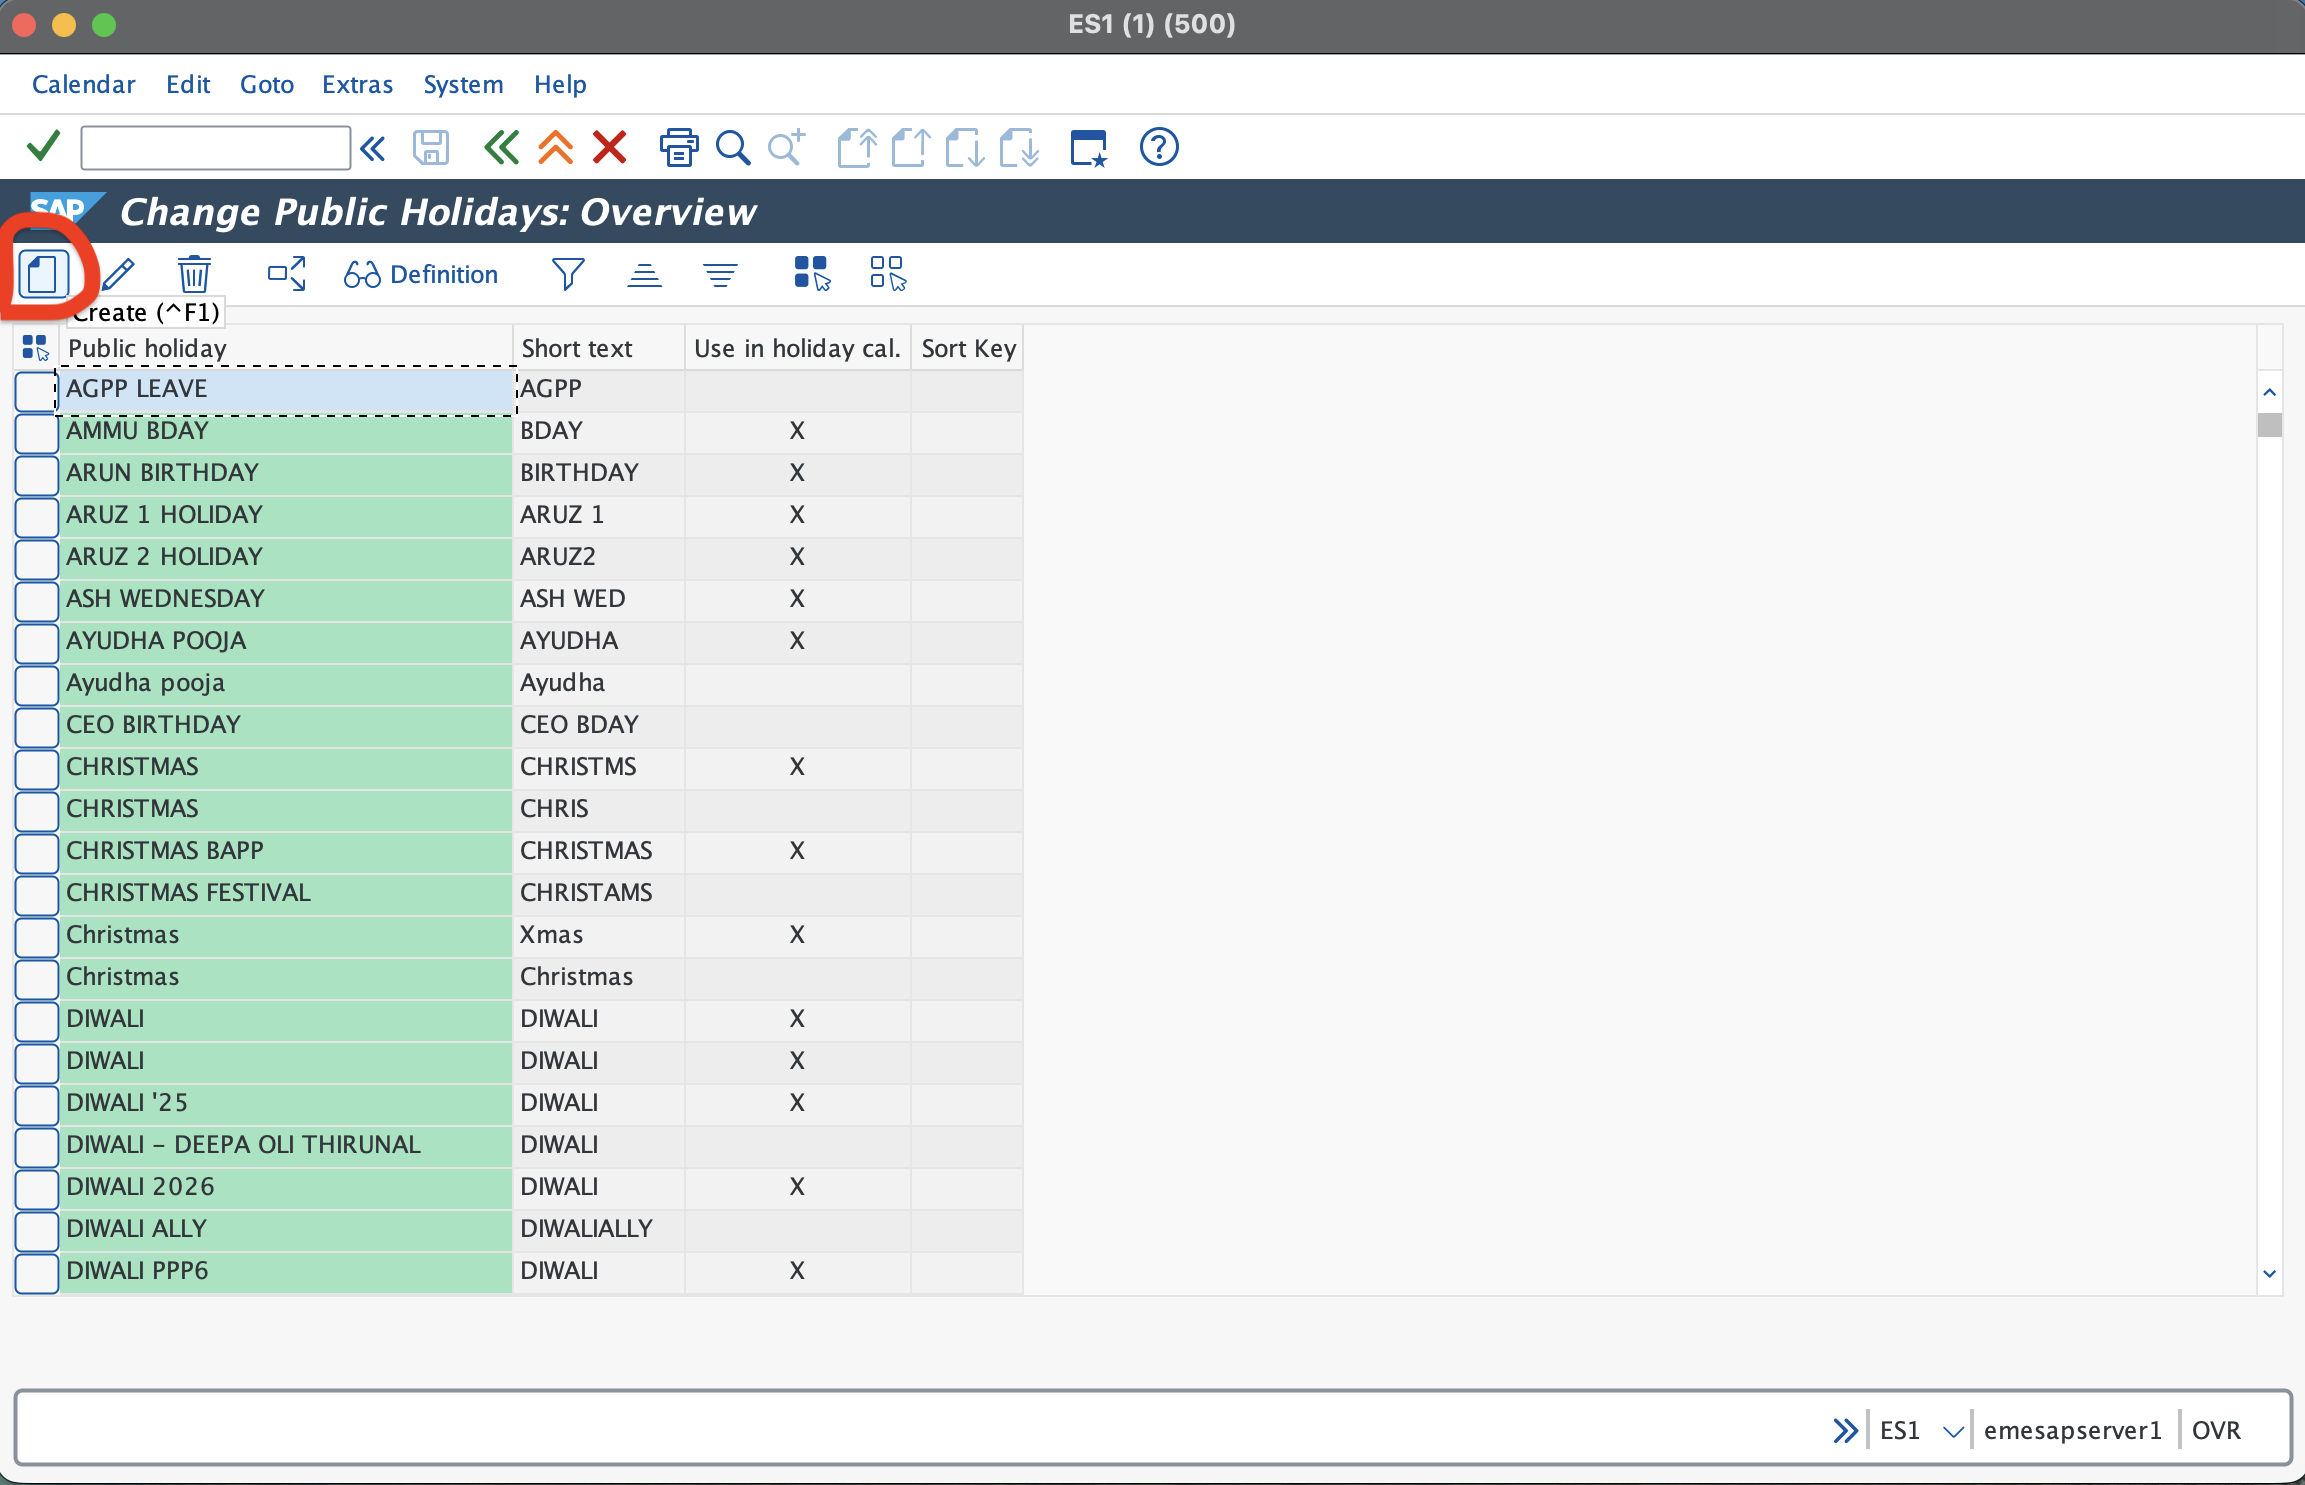
Select the Create button at the top. A pop-up window will appear. Select the option Fixed Date and click the Create button at the bottom.
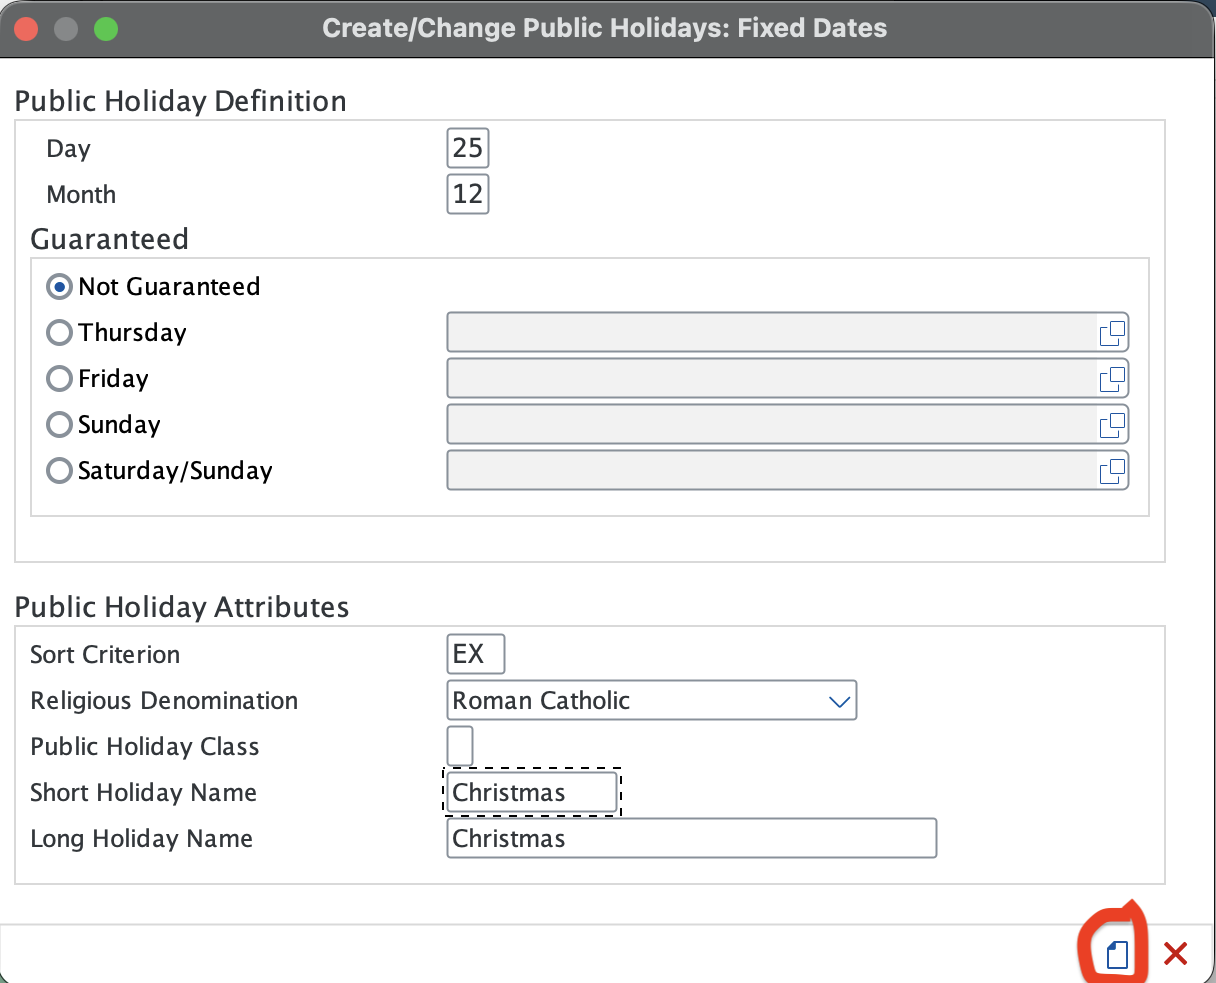
We will fill in the fields with a sample holiday. I have chosen the 25th of December, which is a public holiday in most parts of the world. After that, press the Create button again and a pop-up will appear. Press the green checkmark, and you are done.
Now the second item is the Holiday Calendar. We need to create one using the same steps as before, but this time we assign the public holidays to it. Once you are in the holiday calendar creation screen, you will see something like this.
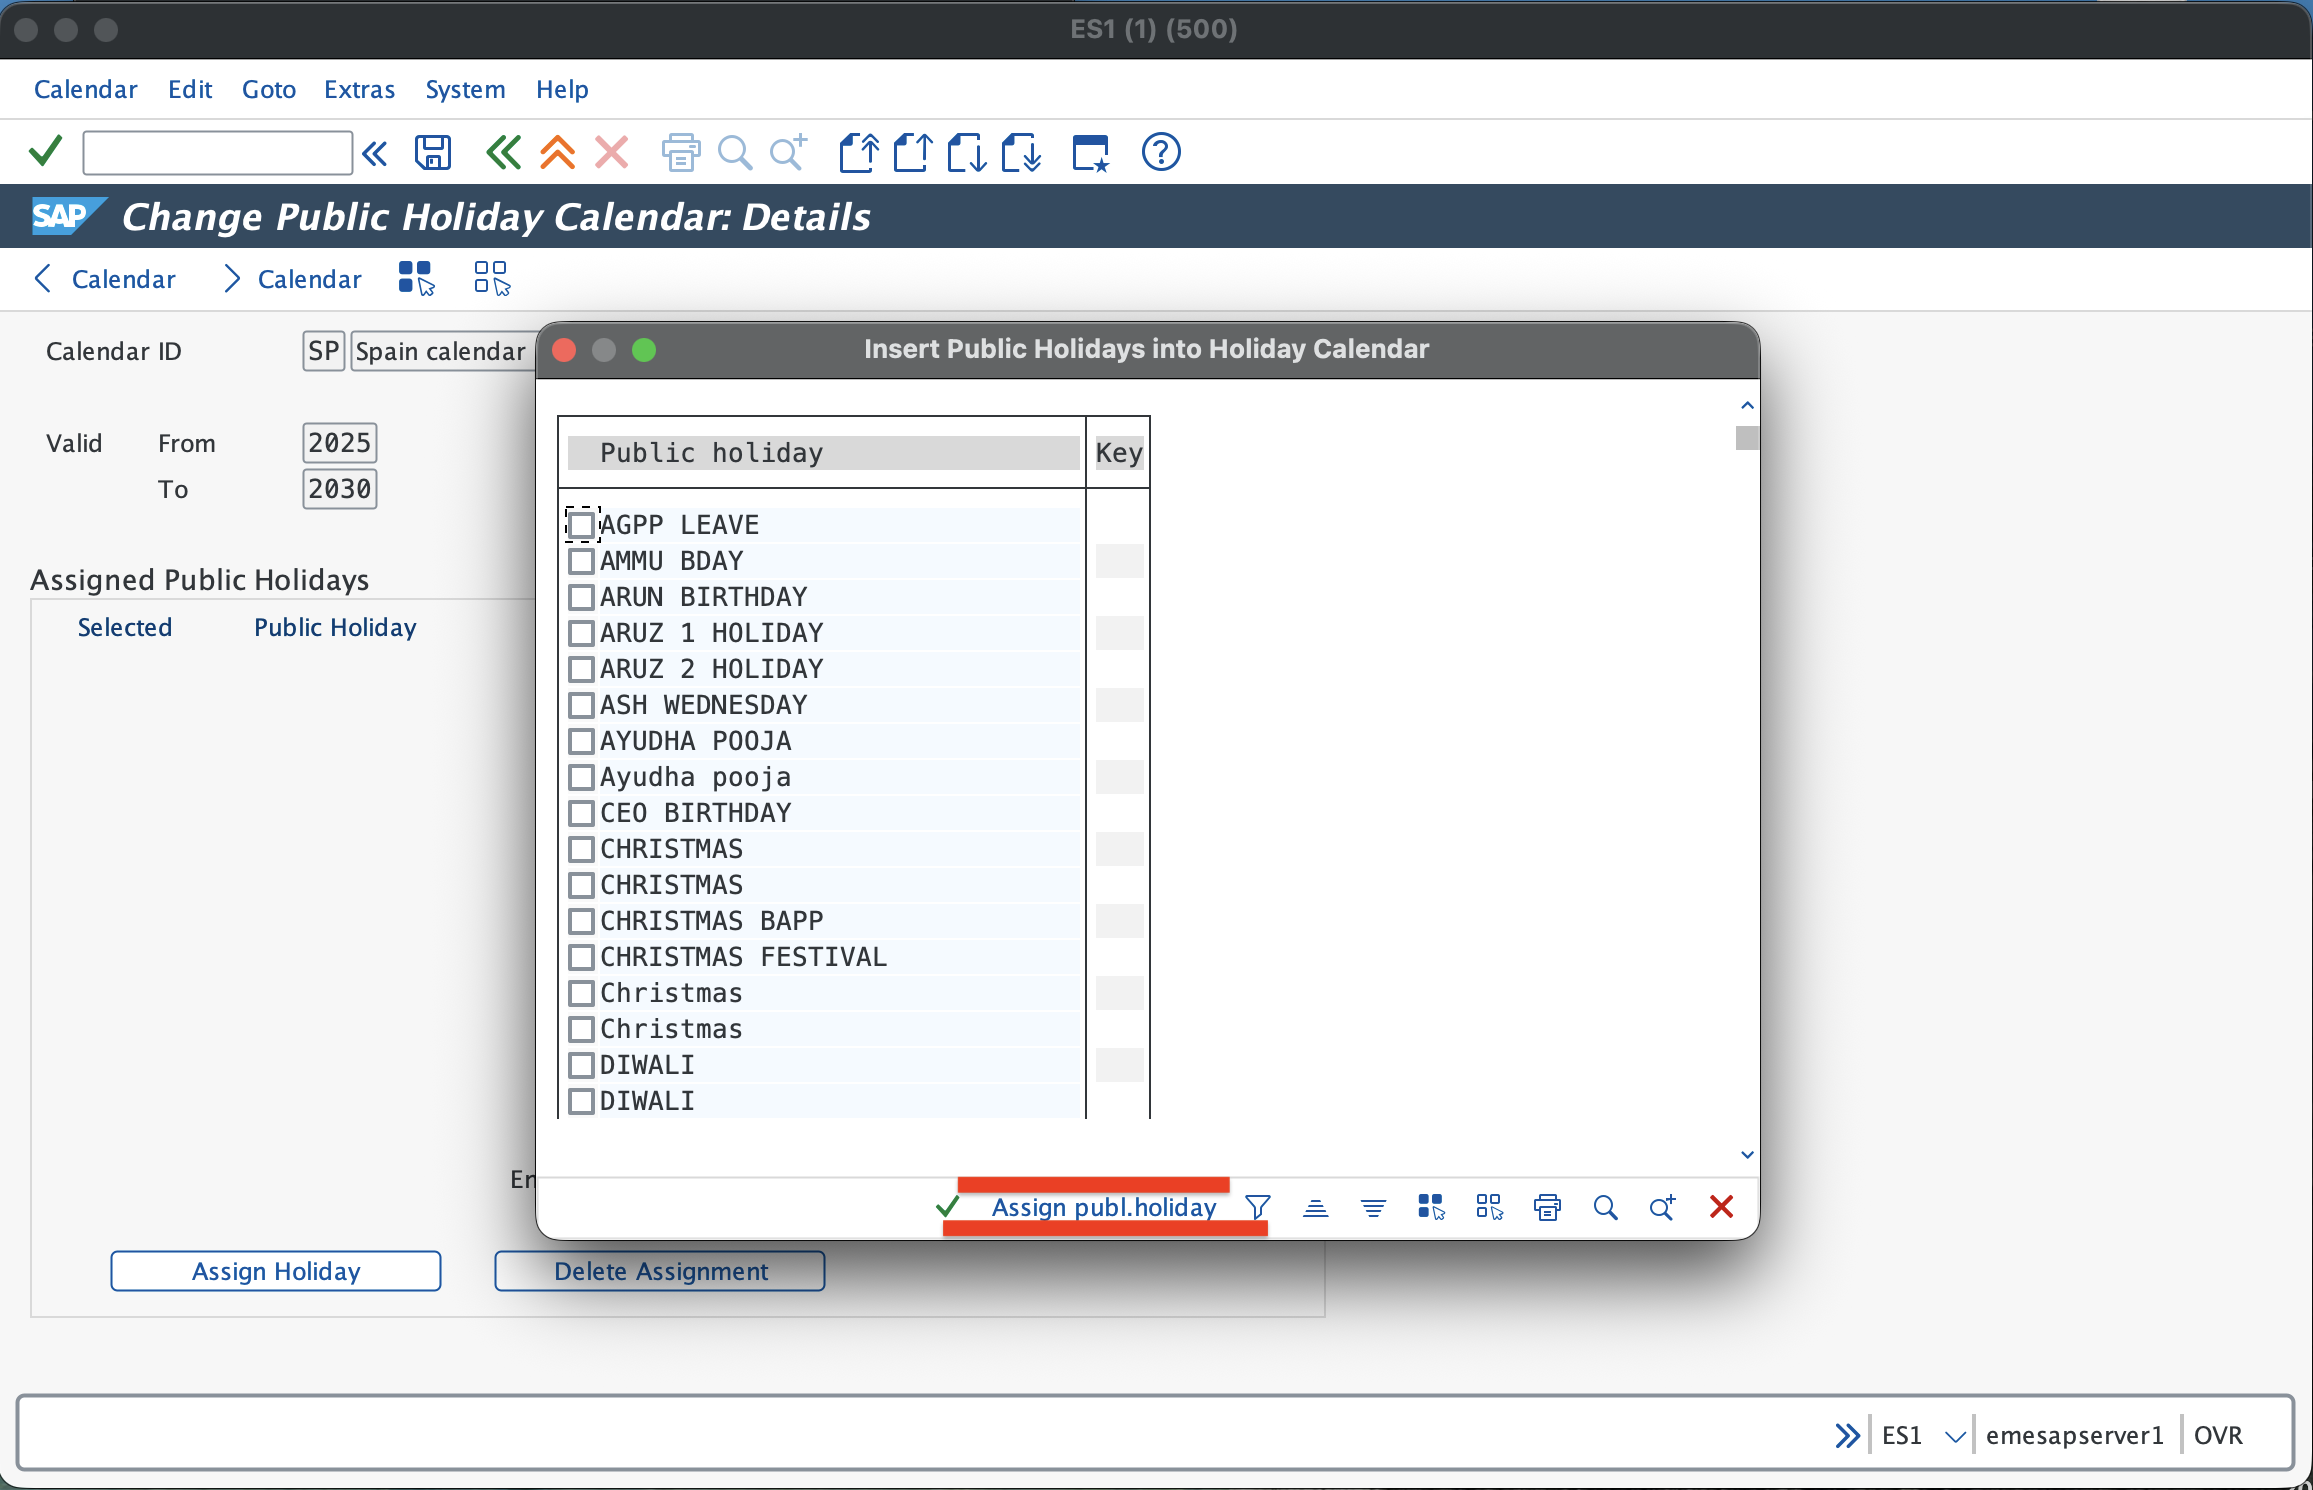
Here you need to enter a calendar ID and a calendar name. Then assign the holiday (in our case, Christmas). Tick the checkbox and click Assign Public Holiday. Finally, press the Save button, and the holiday calendar is created. Make a note of the calendar ID, as we will need it later for the factory calendar.
Now go back and select Factory Calendar from the same menu where we configured the other two. Once you select it, you will see this screen.
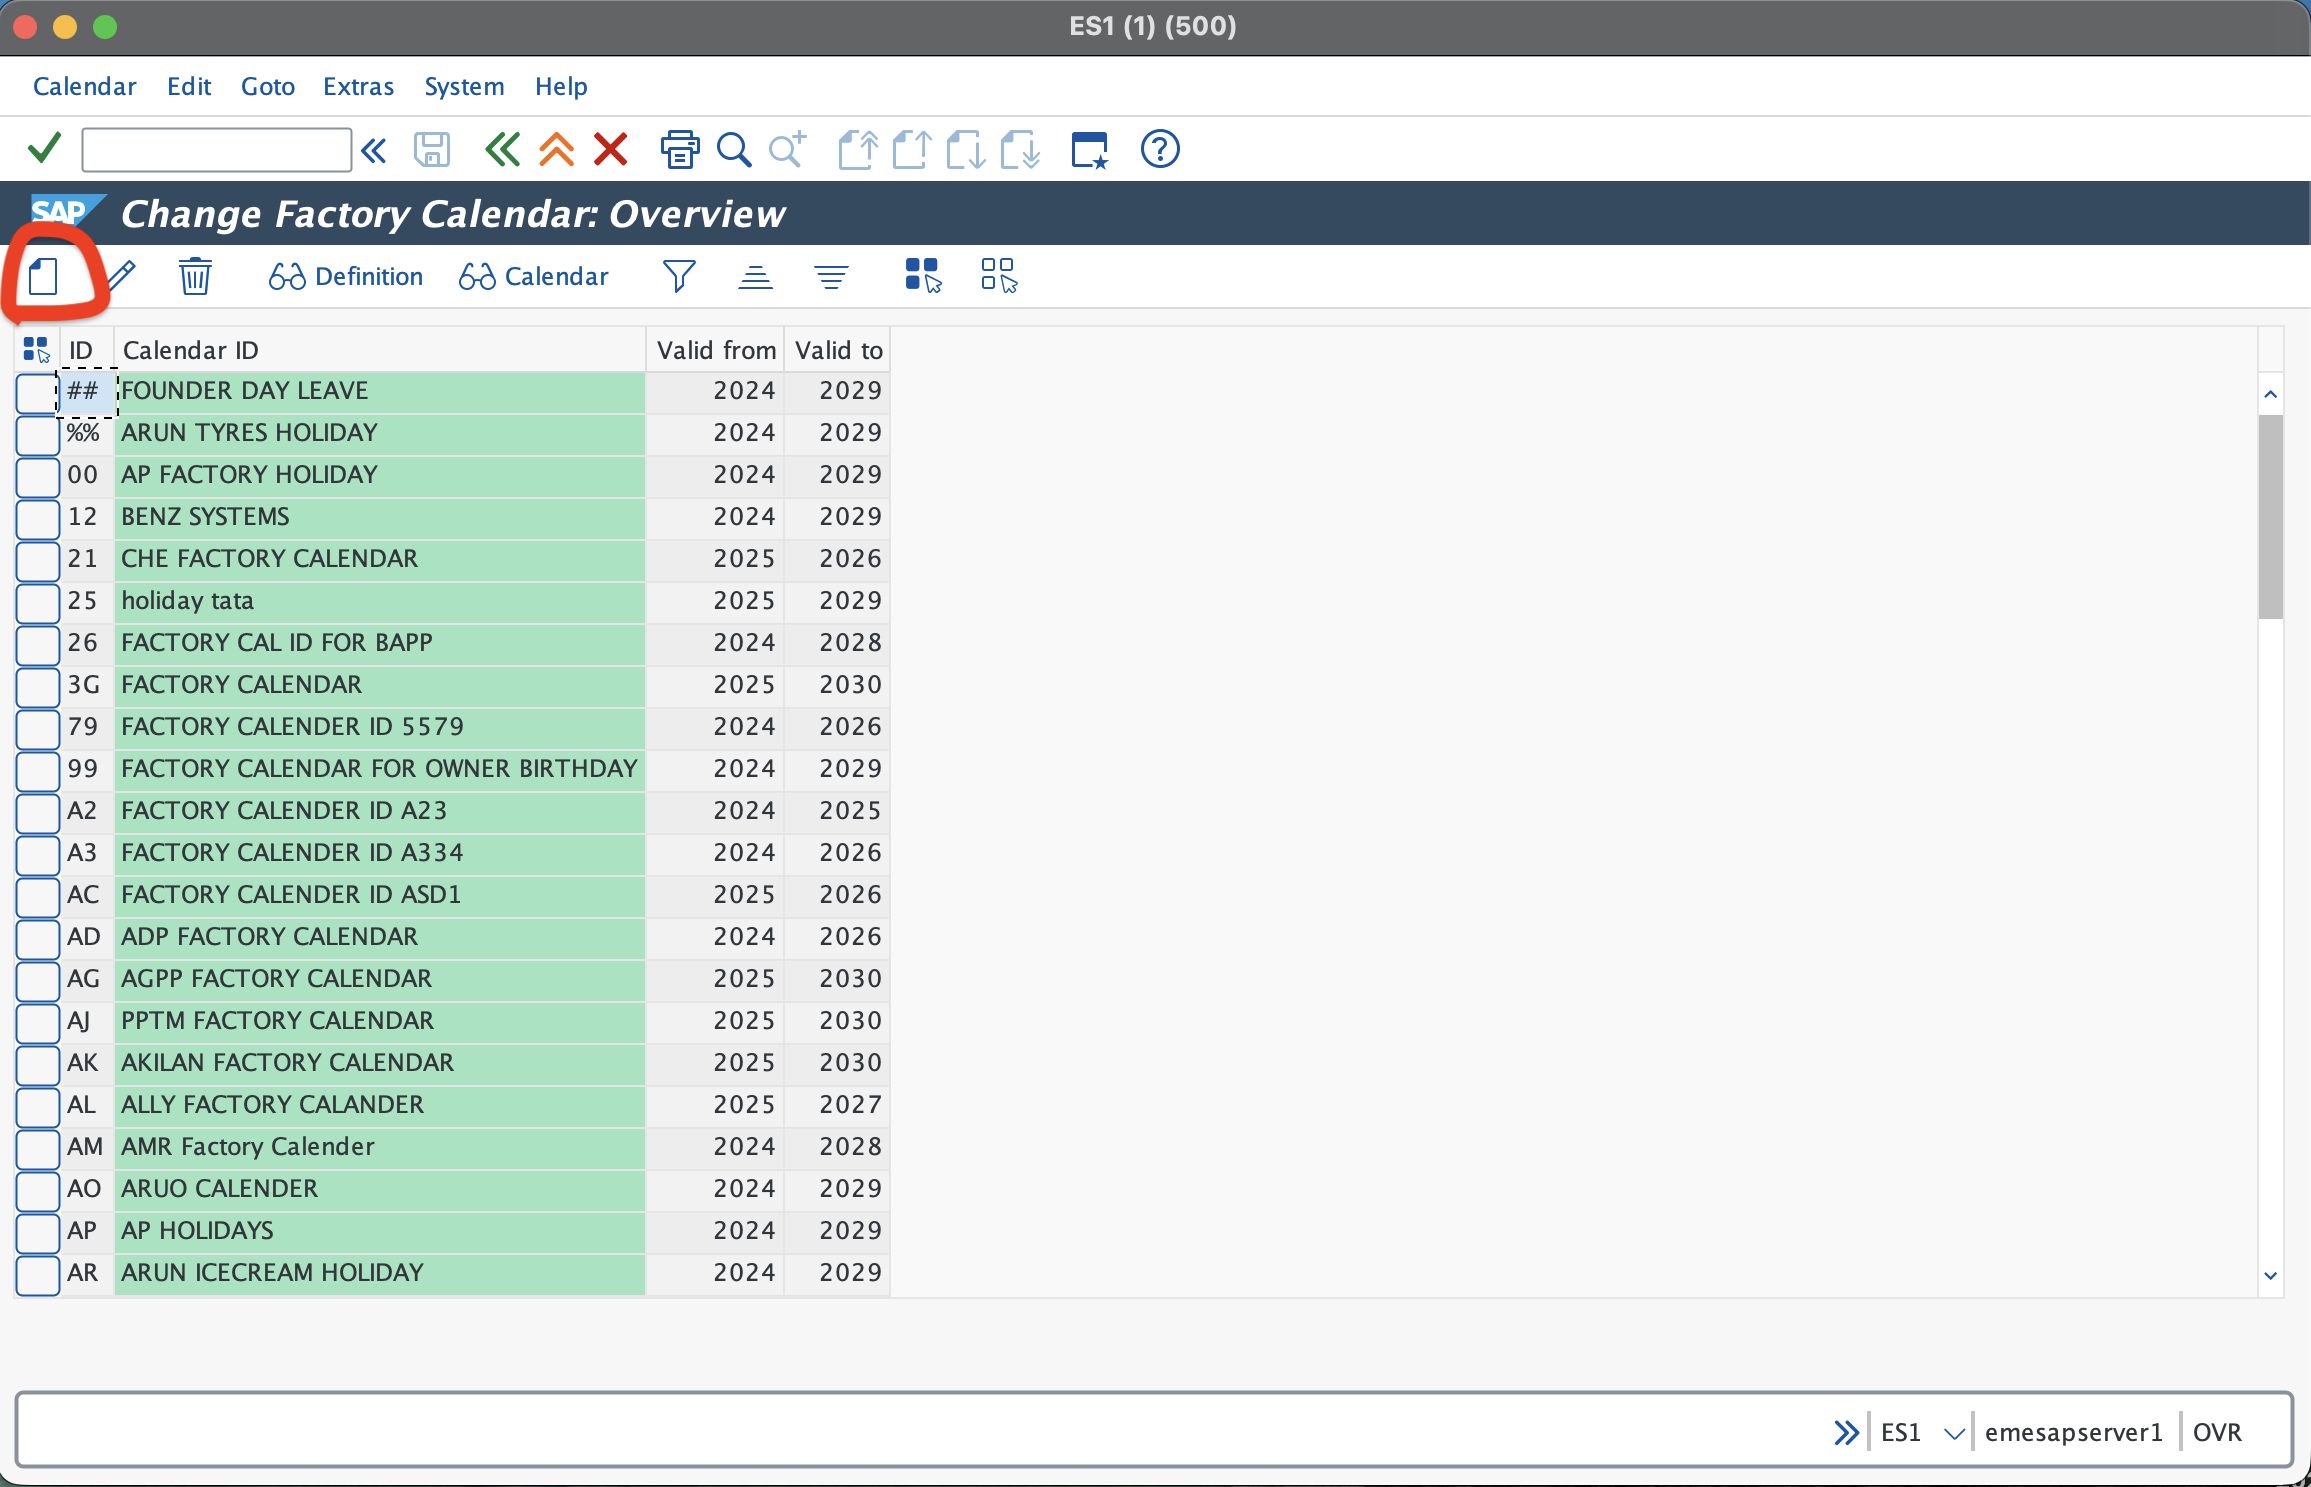
From here, click the Create button as shown in the image.
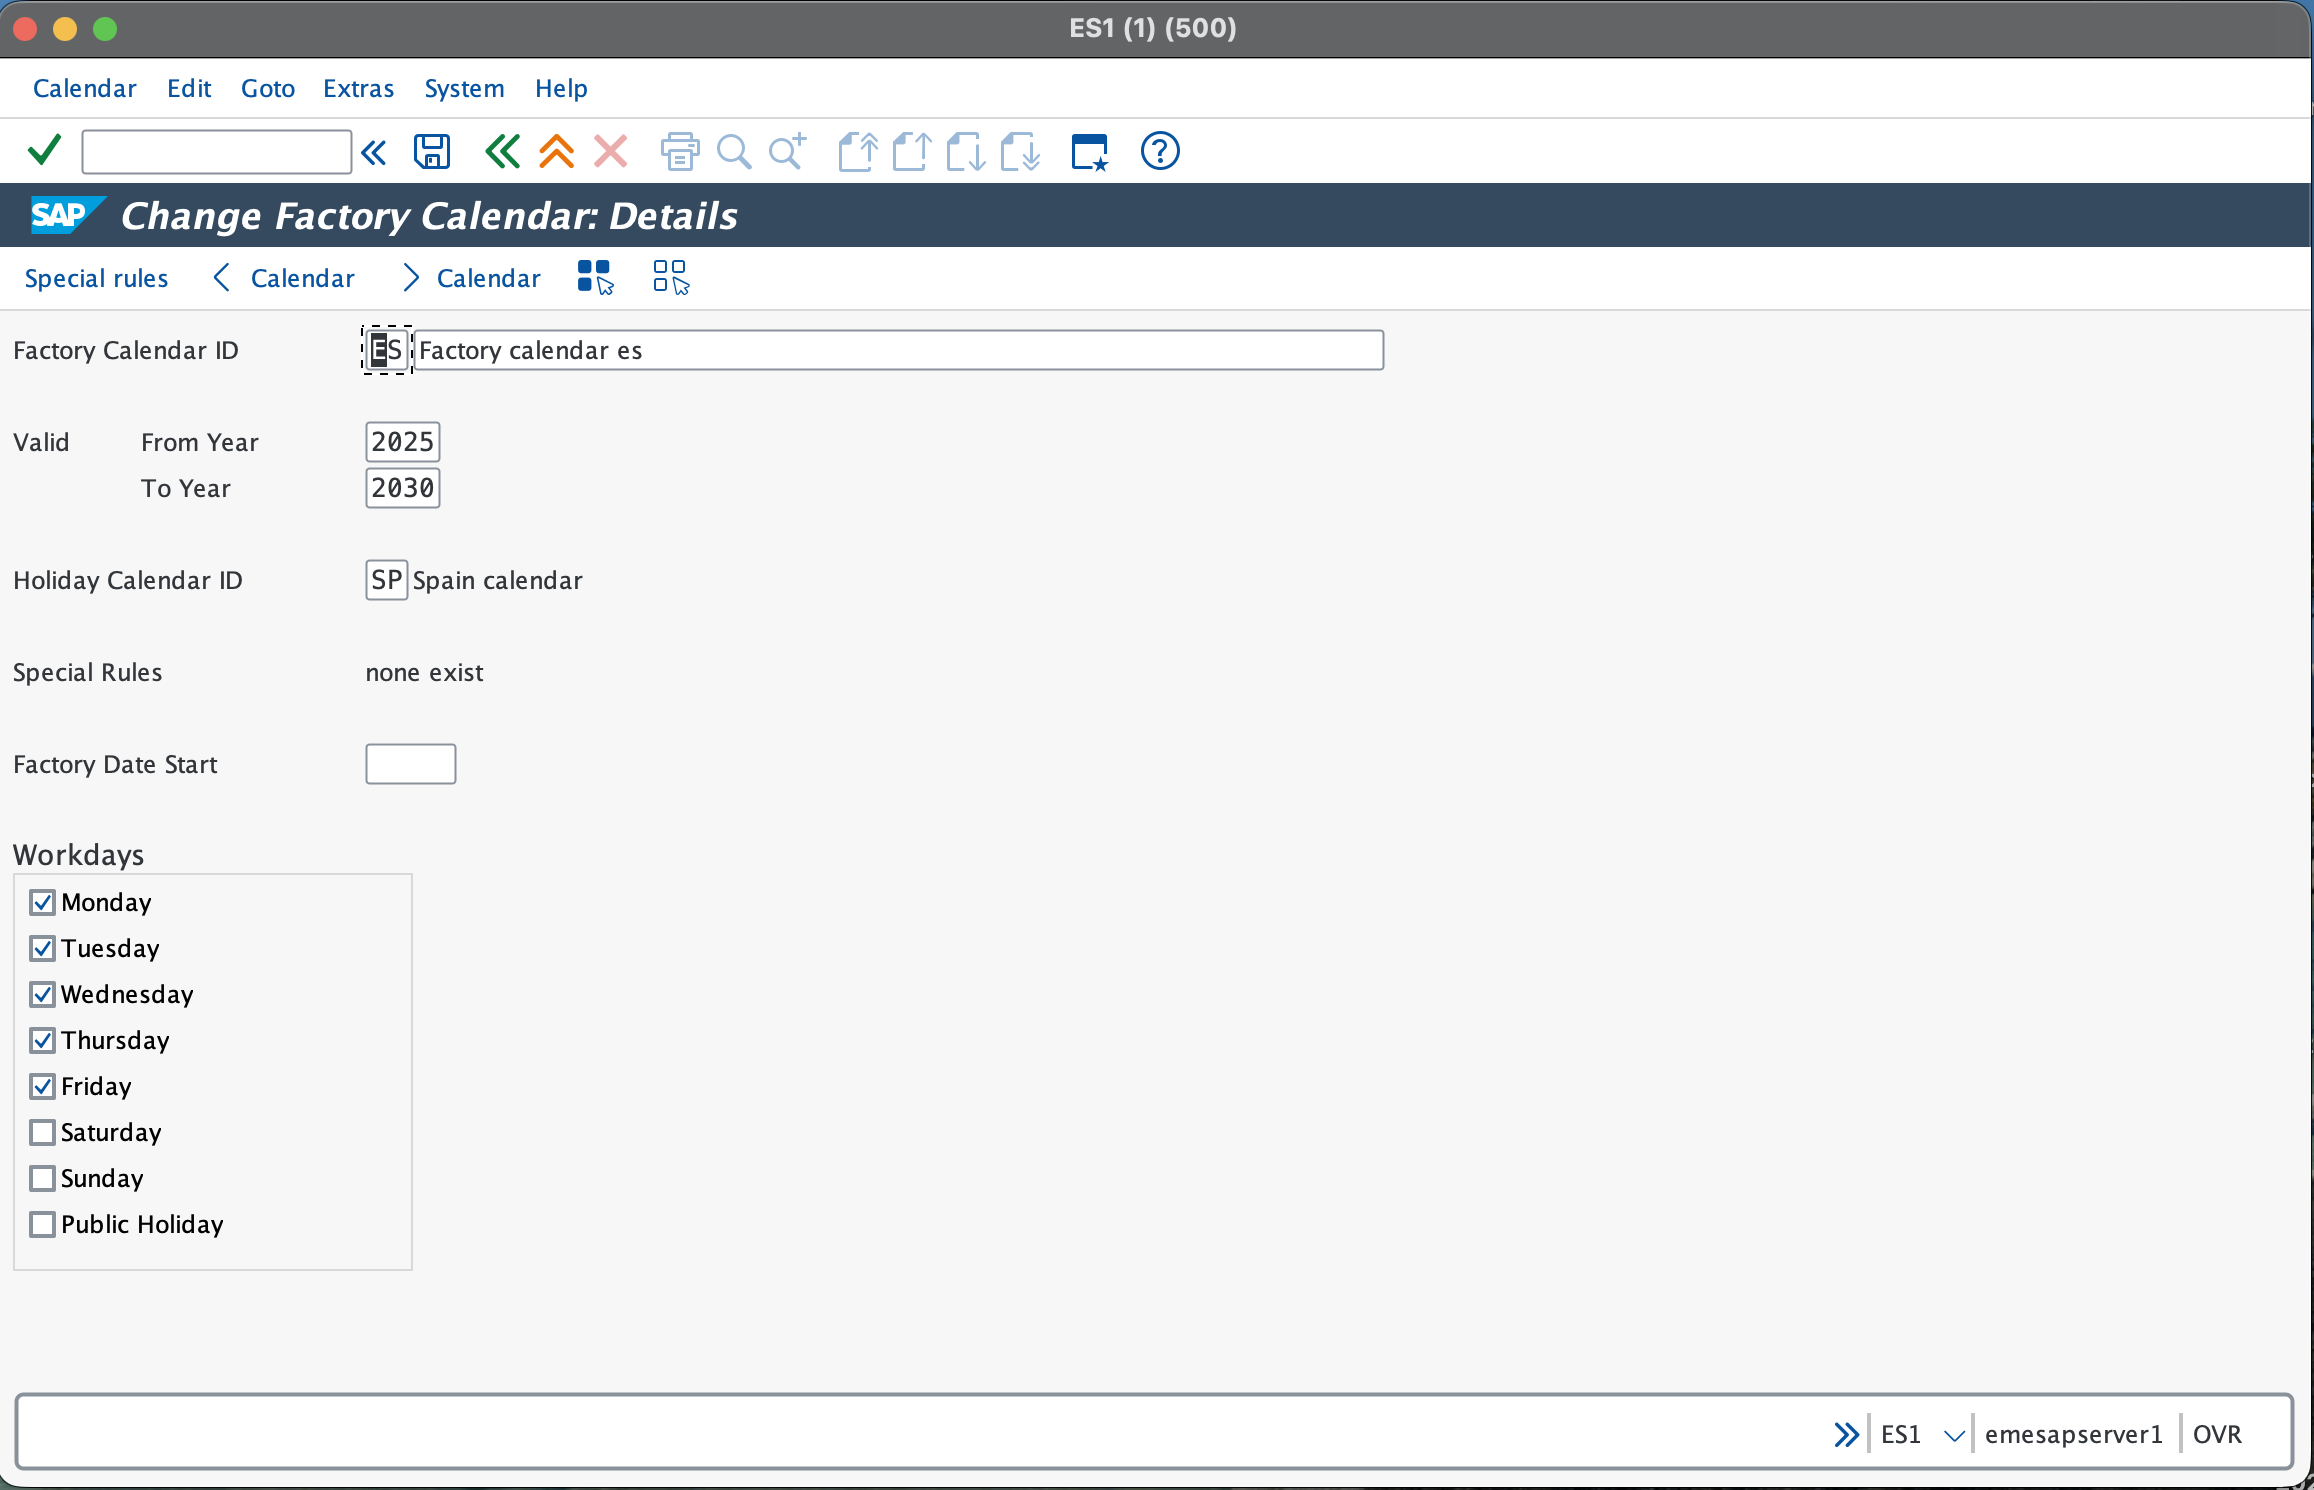
You are now on the factory calendar creation screen. You must enter a factory calendar ID. In my case, I used ES. Give it an appropriate name. Leave the Valid From and Valid To fields as they are.
The final step is to link your holiday calendar to your factory calendar. After doing this, press Save, and a pop-up will appear. Press the green checkmark. That’s it — you have created a factory calendar.
Let’s get back to creating a plant
We use the OX10 t-code to create a plant. Click on Create and fill in the data as follows. Since we have now created our factory calendar, we can assign it here as well. Note that the plant is a 4-character alphanumeric code. In my case, it is MD01.
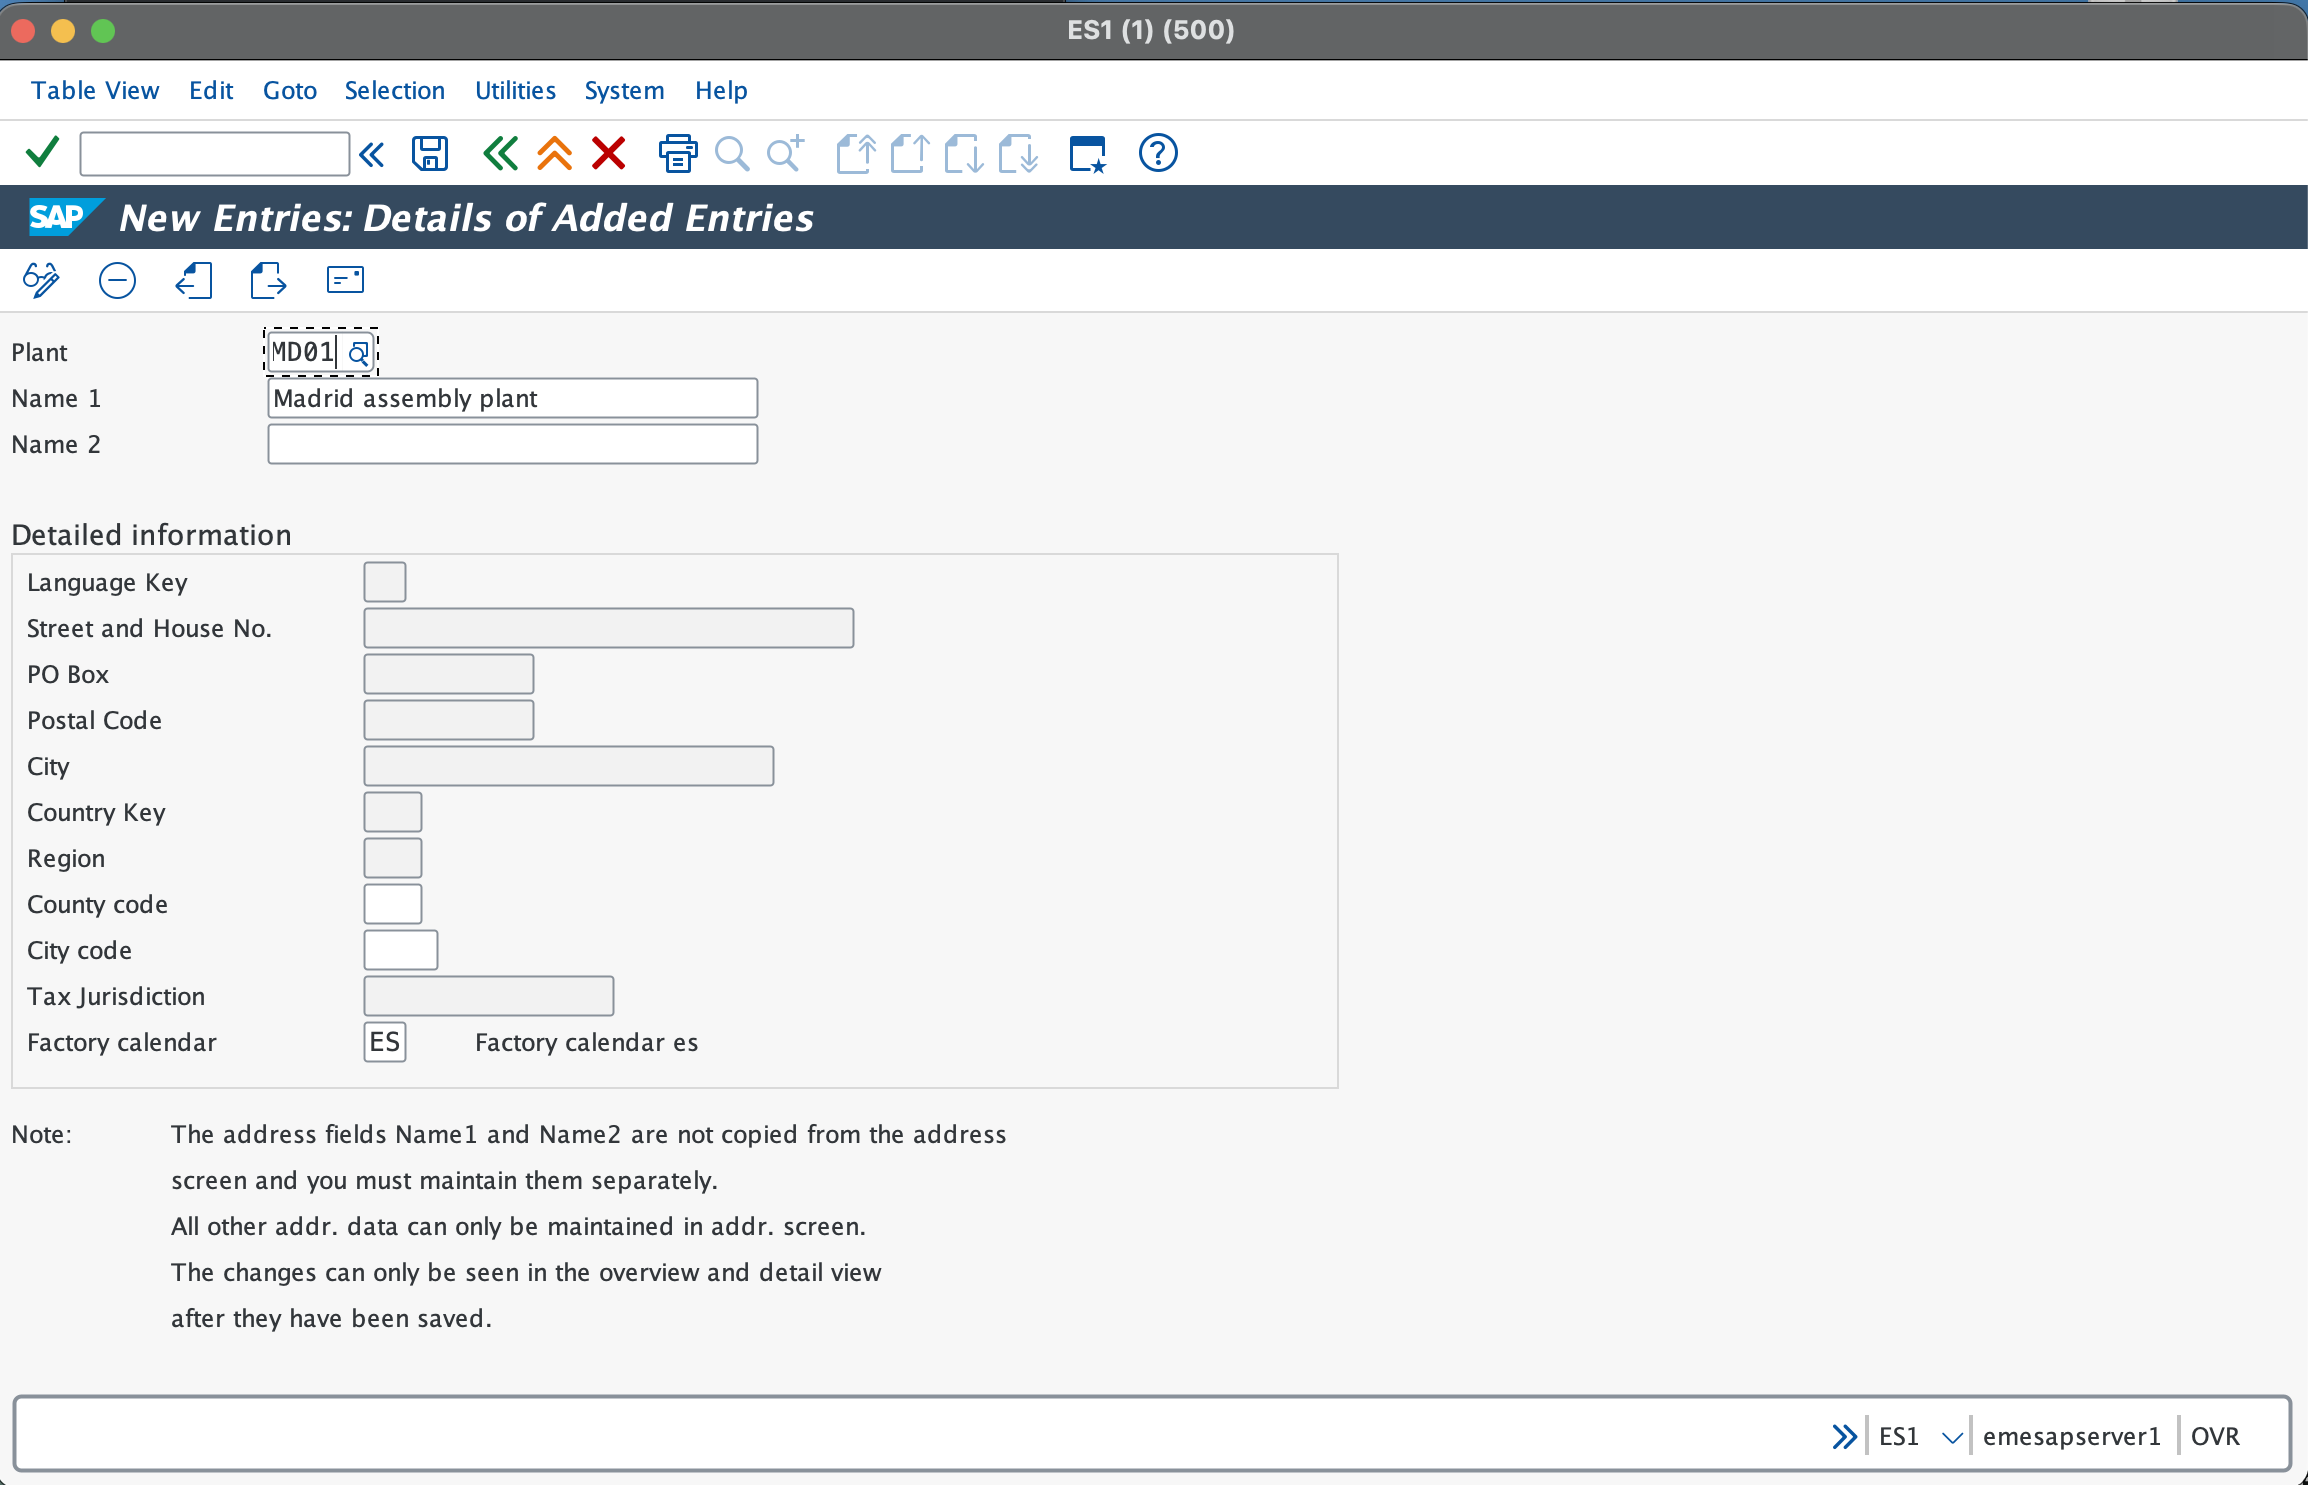
Now press Save. A pop-up window will appear where you need to enter address and communication details, just like we did in the company code creation.
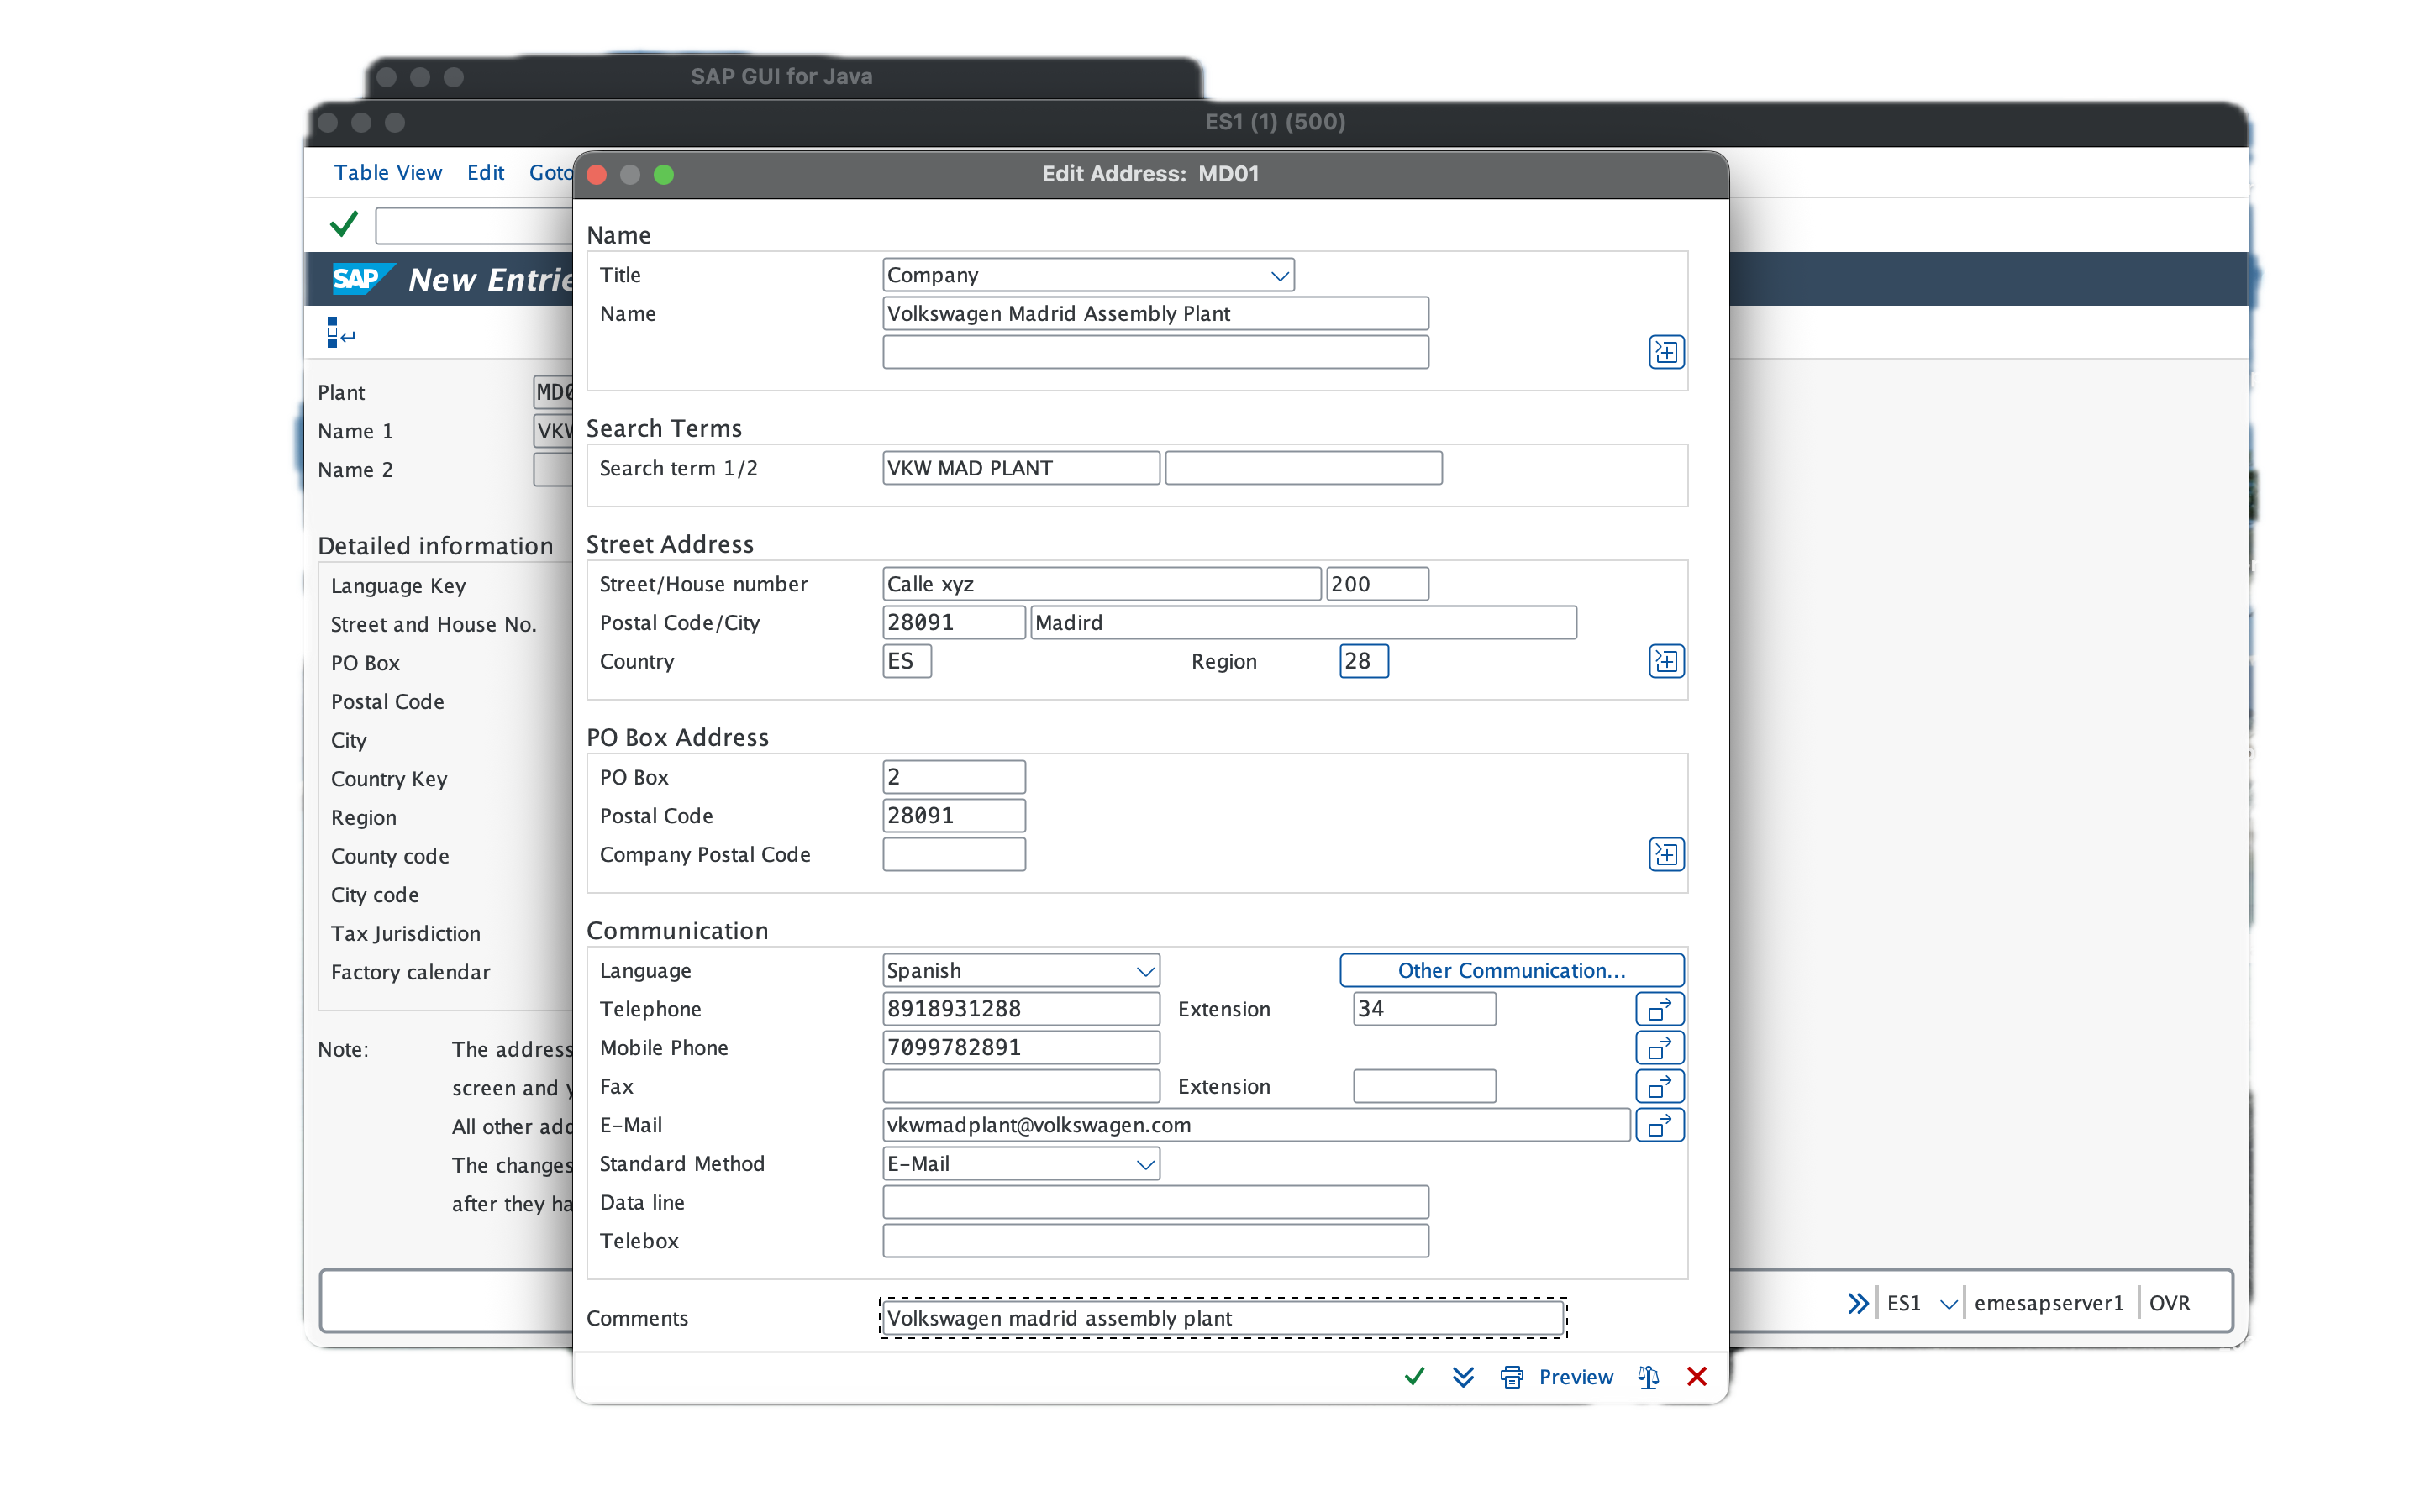
As you can see, I have filled in the address and communication information. Press the checkmark at the bottom once you are done. A transport request will appear — confirm it, and you are done. You have successfully created a plant.
Creating a Storage Location
As explained in the example, you need to have a storage location linked to the plant. So we are going to create one here. The t-code for creating a storage location is OX09. You can also use the SAP IMG path: Enterprise Structure → Definition → Materials Management → Maintain Storage Location.
I am going to use OX09. You will be asked to enter your plant in a screen like this. Once you enter the 4-character plant code, press Enter.
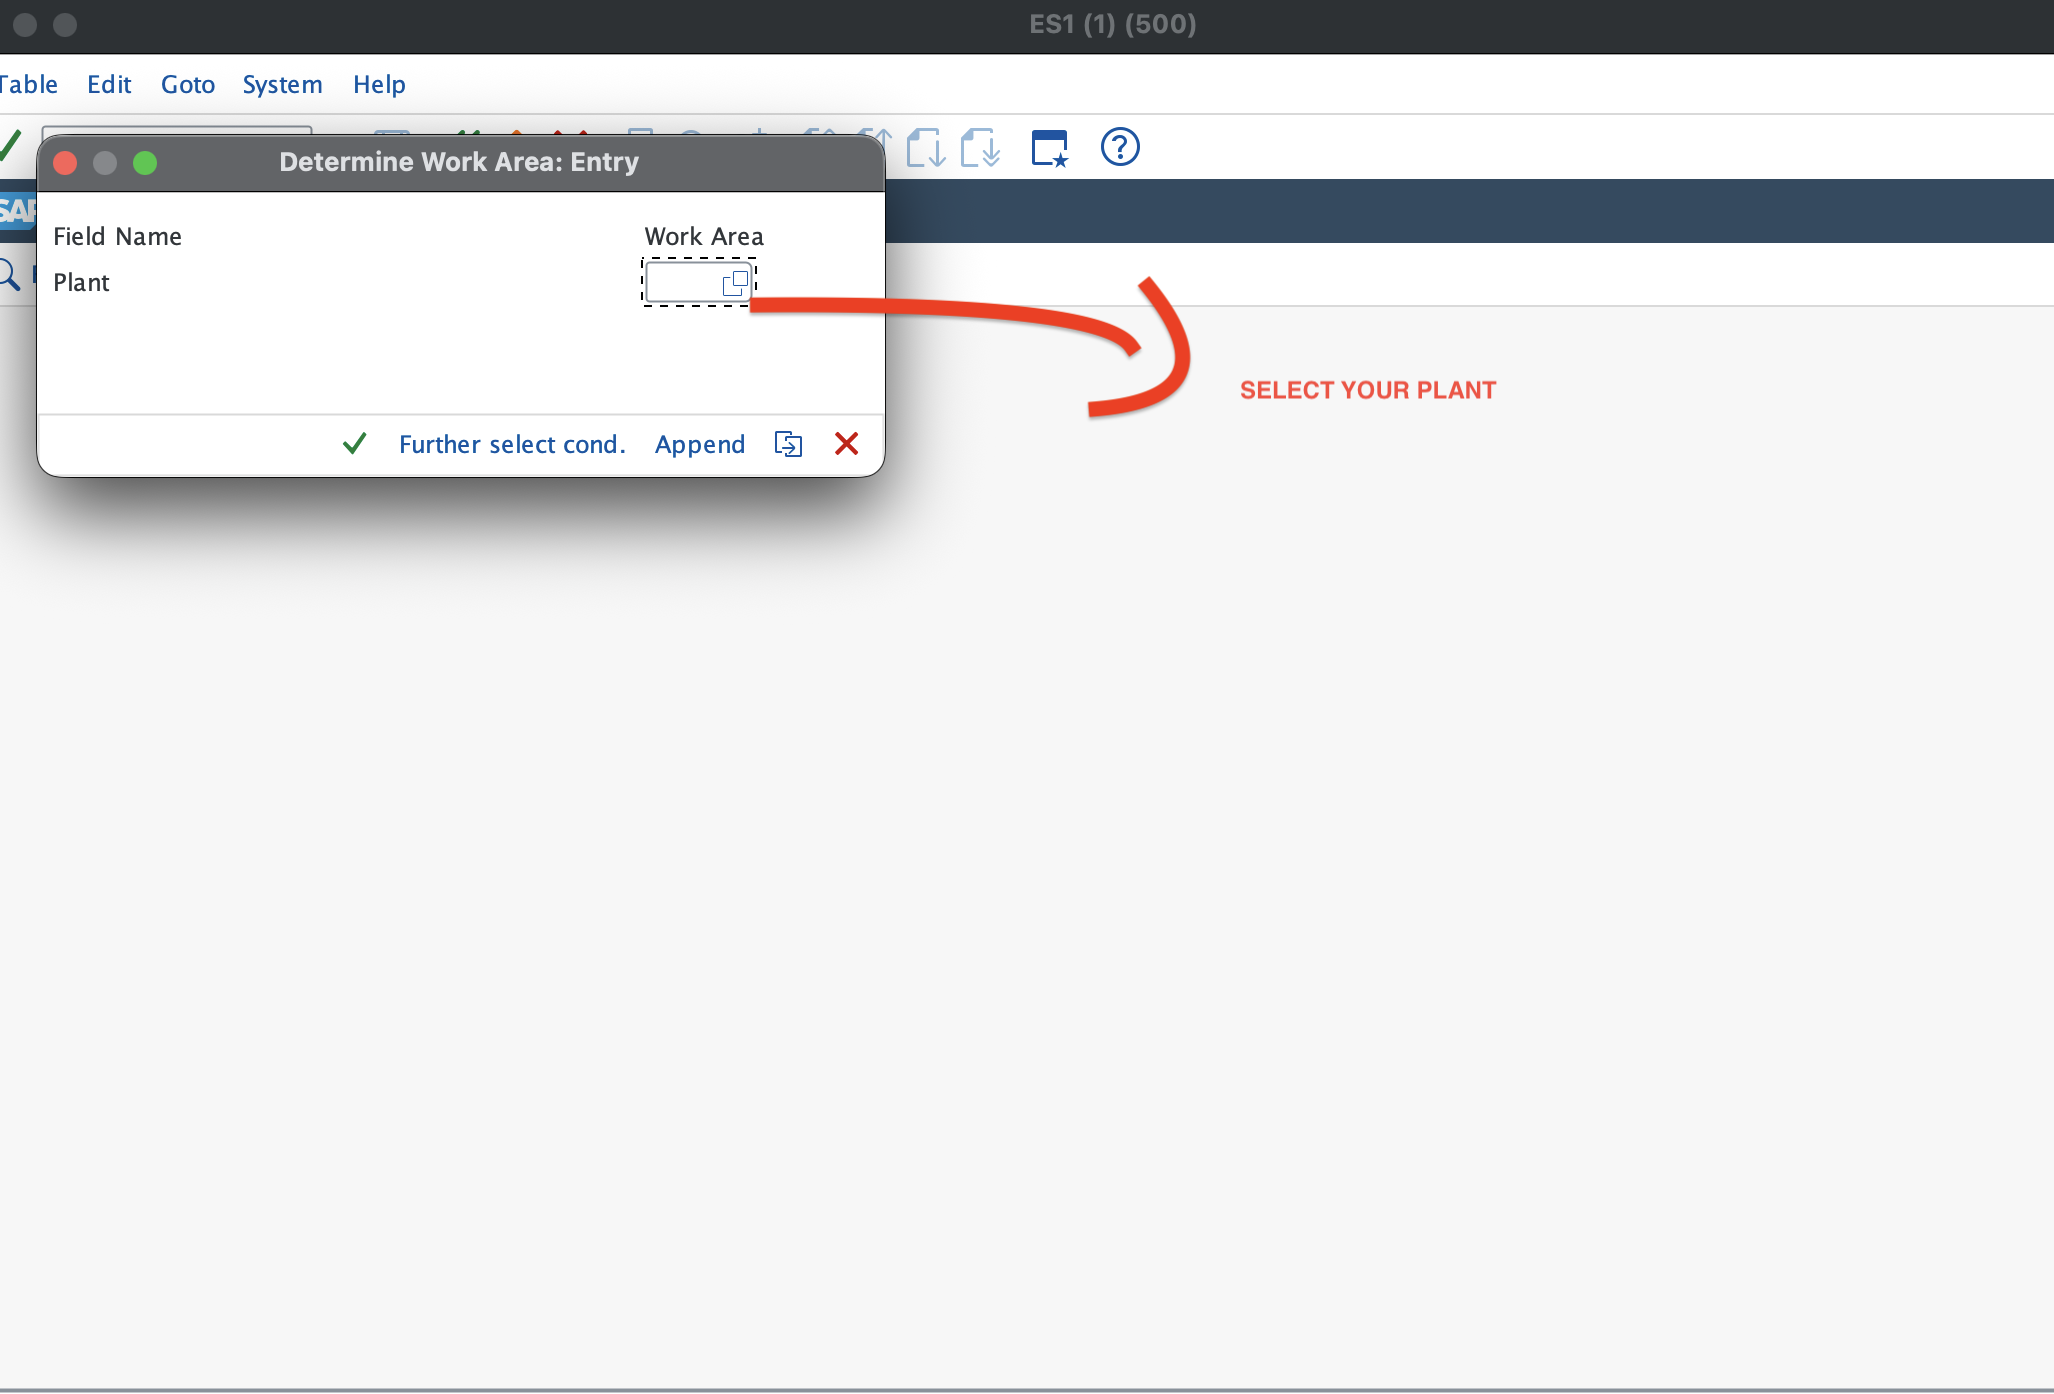
After entering the plant, you will arrive at this screen.
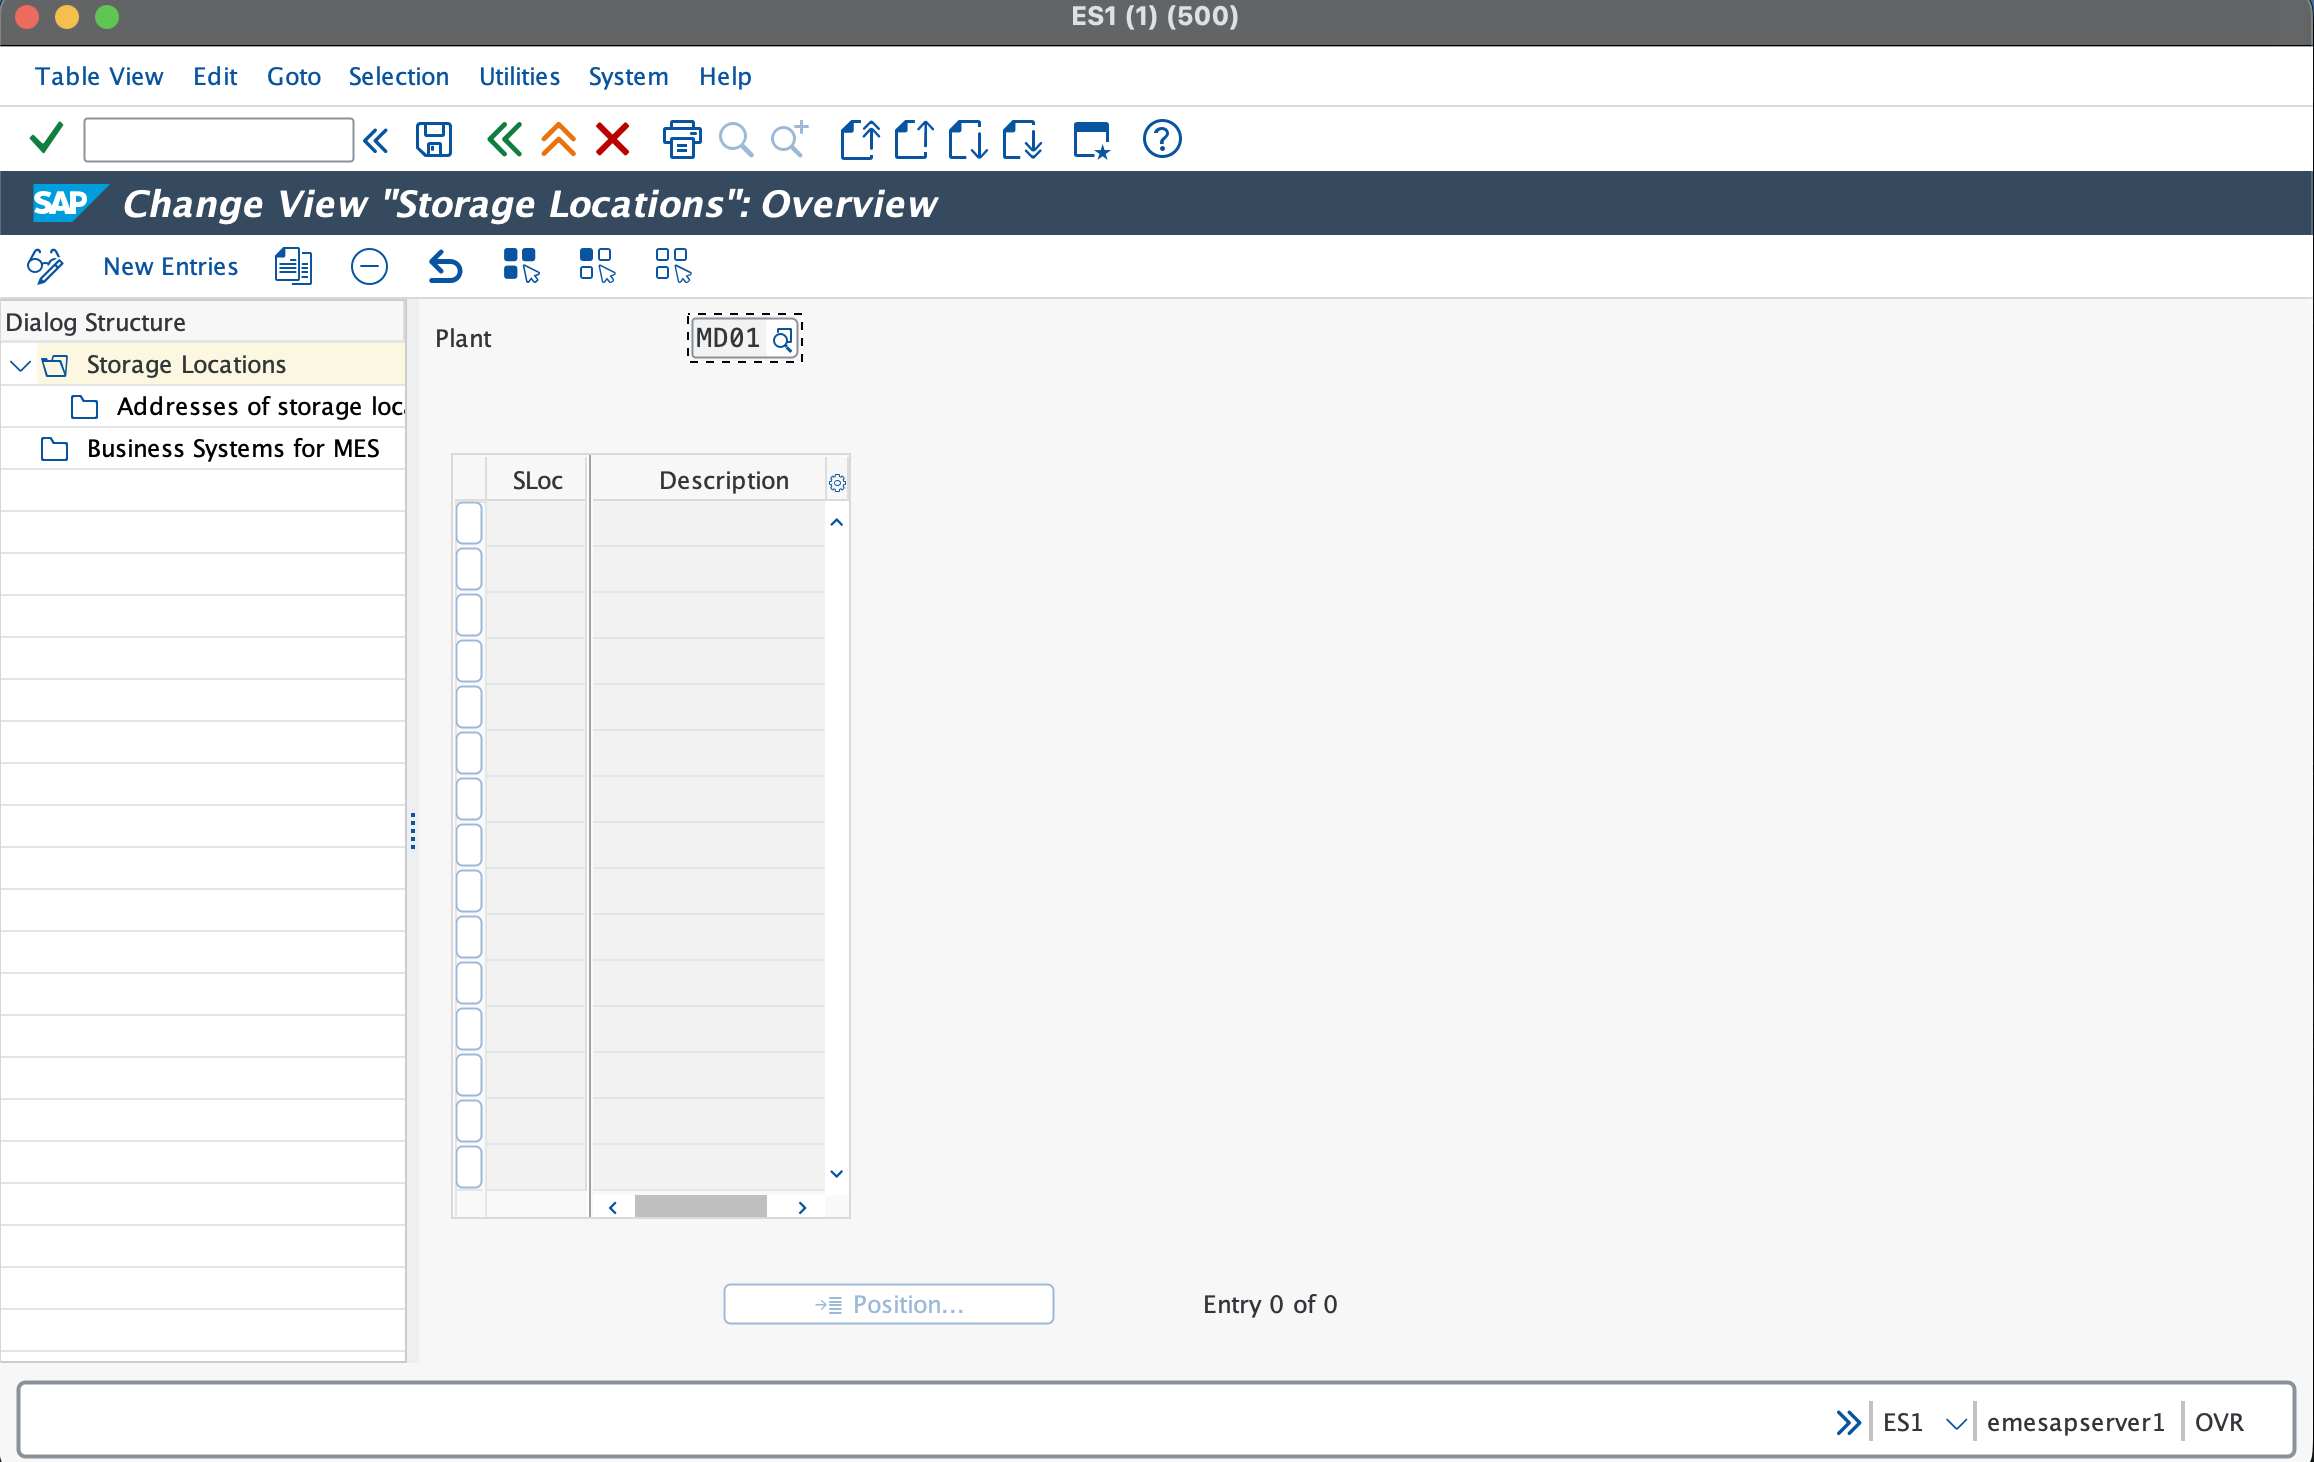
Select the New Entries button, and the cursor will move to the Sloc column, where you need to enter the 4-character storage location code. In my case, I am creating three storage locations: RM01, FG01, and QA01.
In the description column, provide a short description of what each storage location is used for.
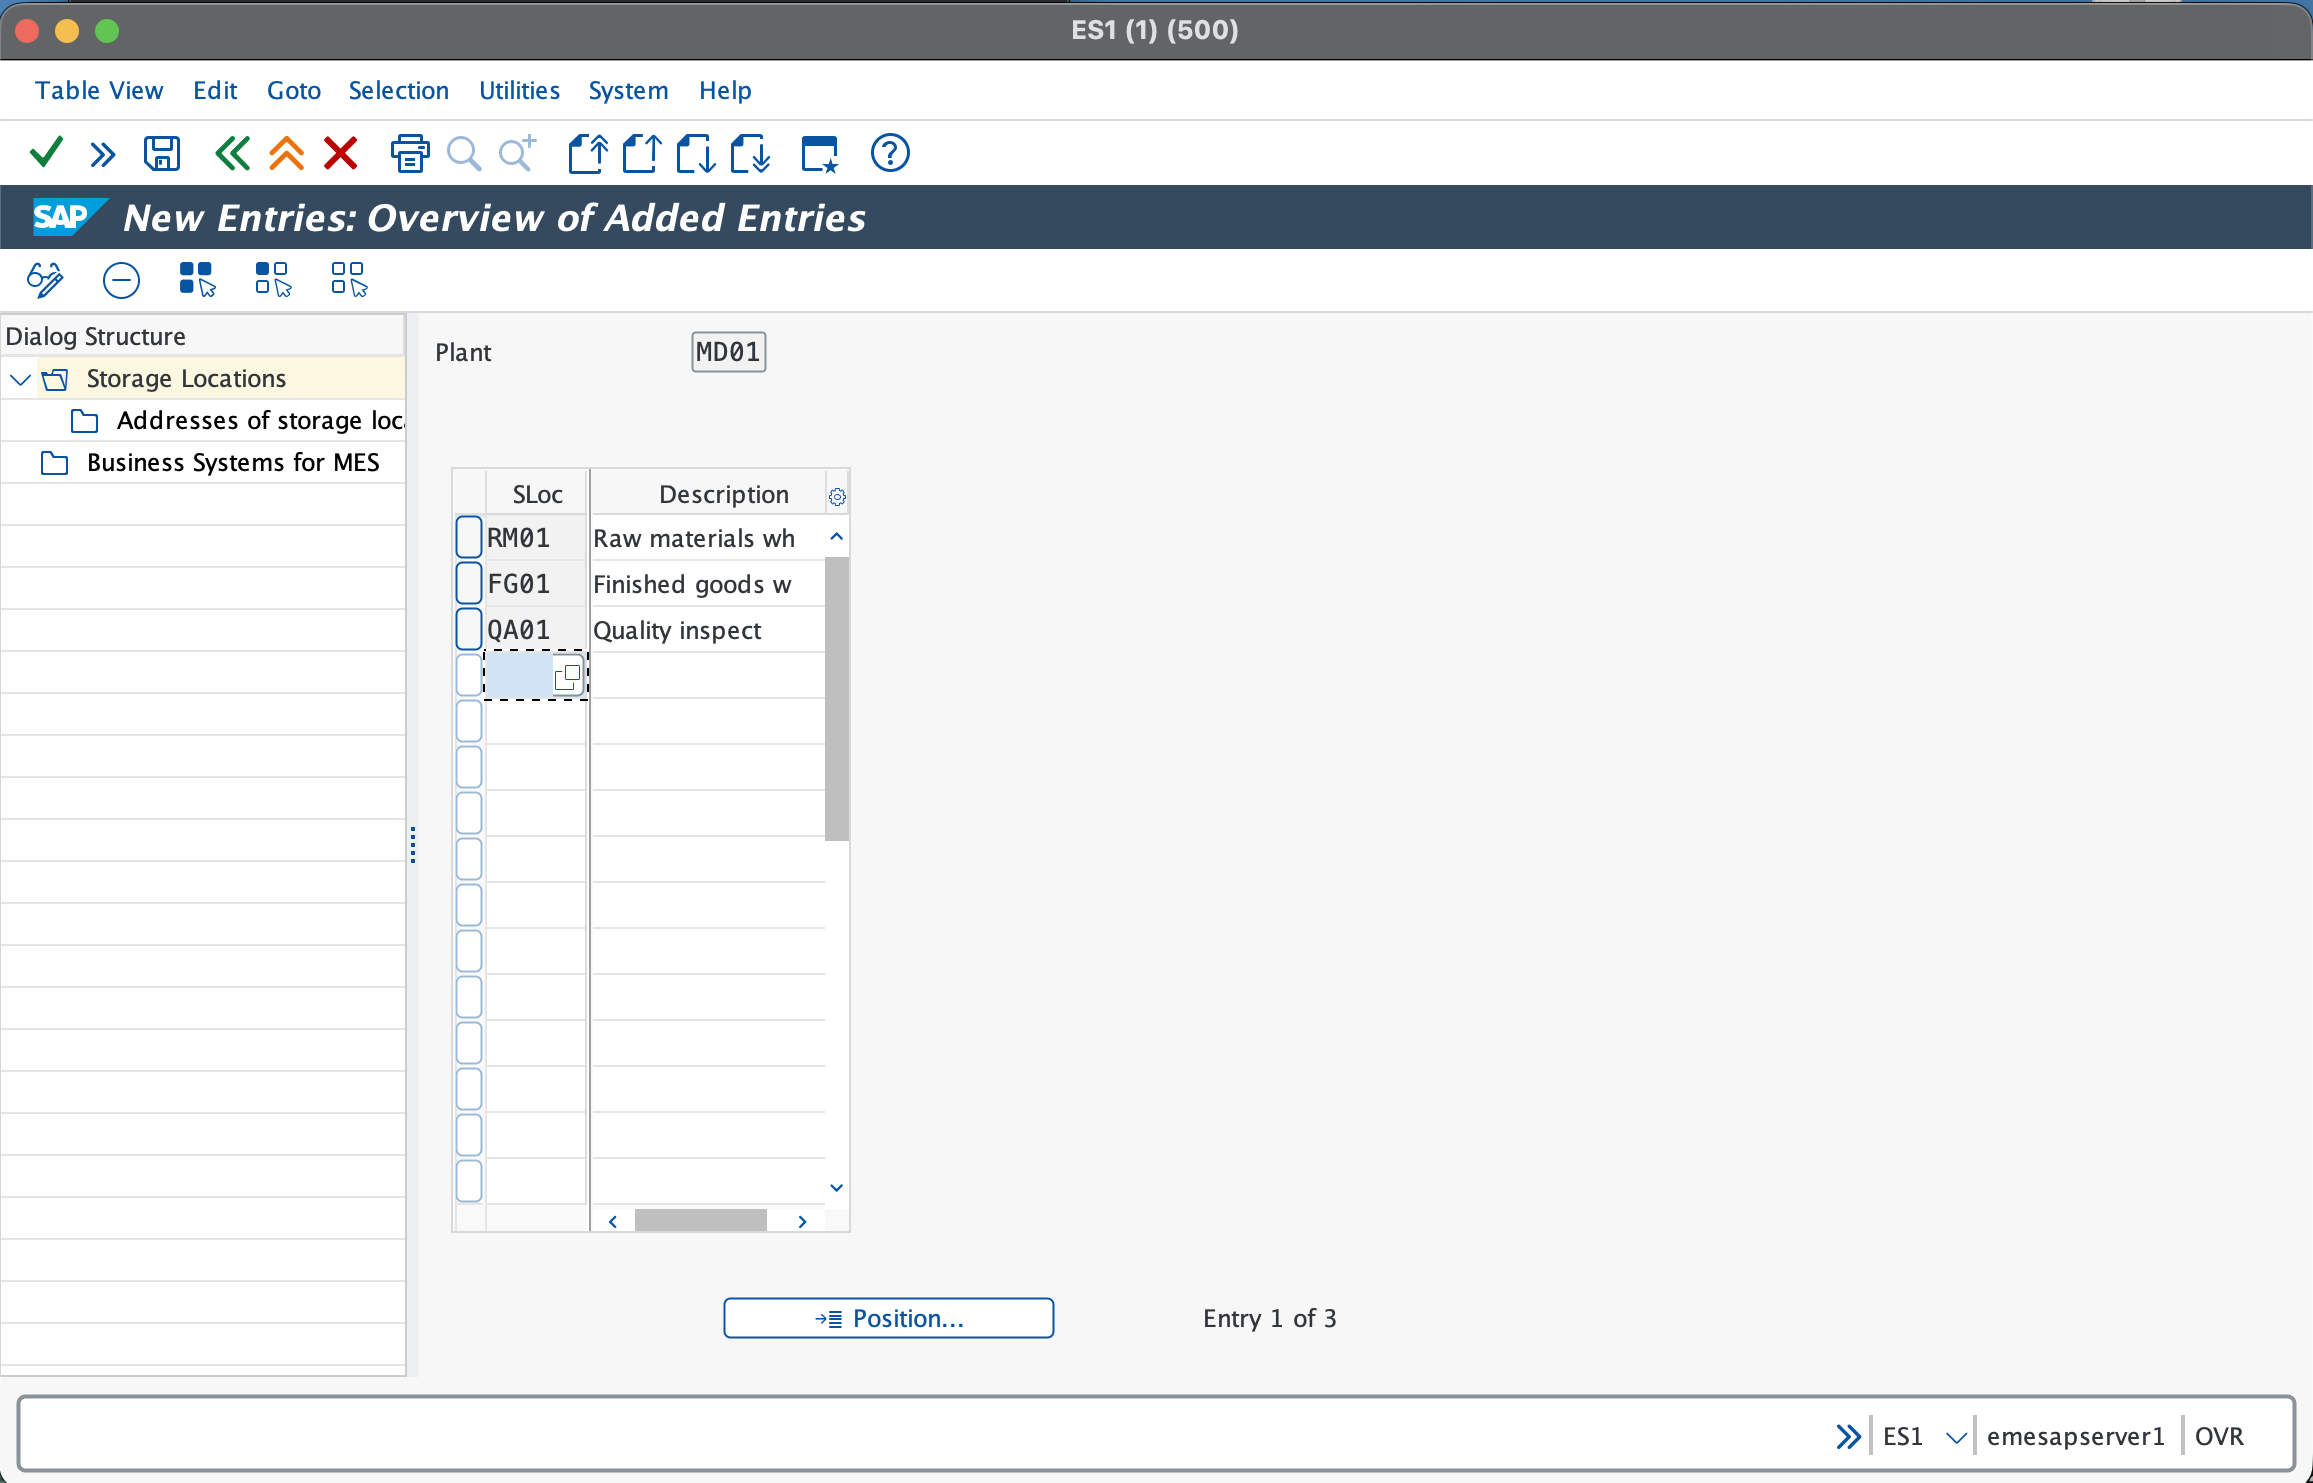
At this point, you could simply save and finish. However, you may notice two additional options. One of them is the Business System for MES field, which is used when SAP is integrated with a Manufacturing Execution System (MES). It identifies the external manufacturing system responsible for production execution and shop floor activities. For basic configuration and learning purposes, this field can generally be left blank.
The other option is the Storage Location Address, which assigns an address to the storage location. To do this, select the storage location by ticking the checkbox on the left, then double-click on Storage Location Address from the menu on the left. You will see this screen.
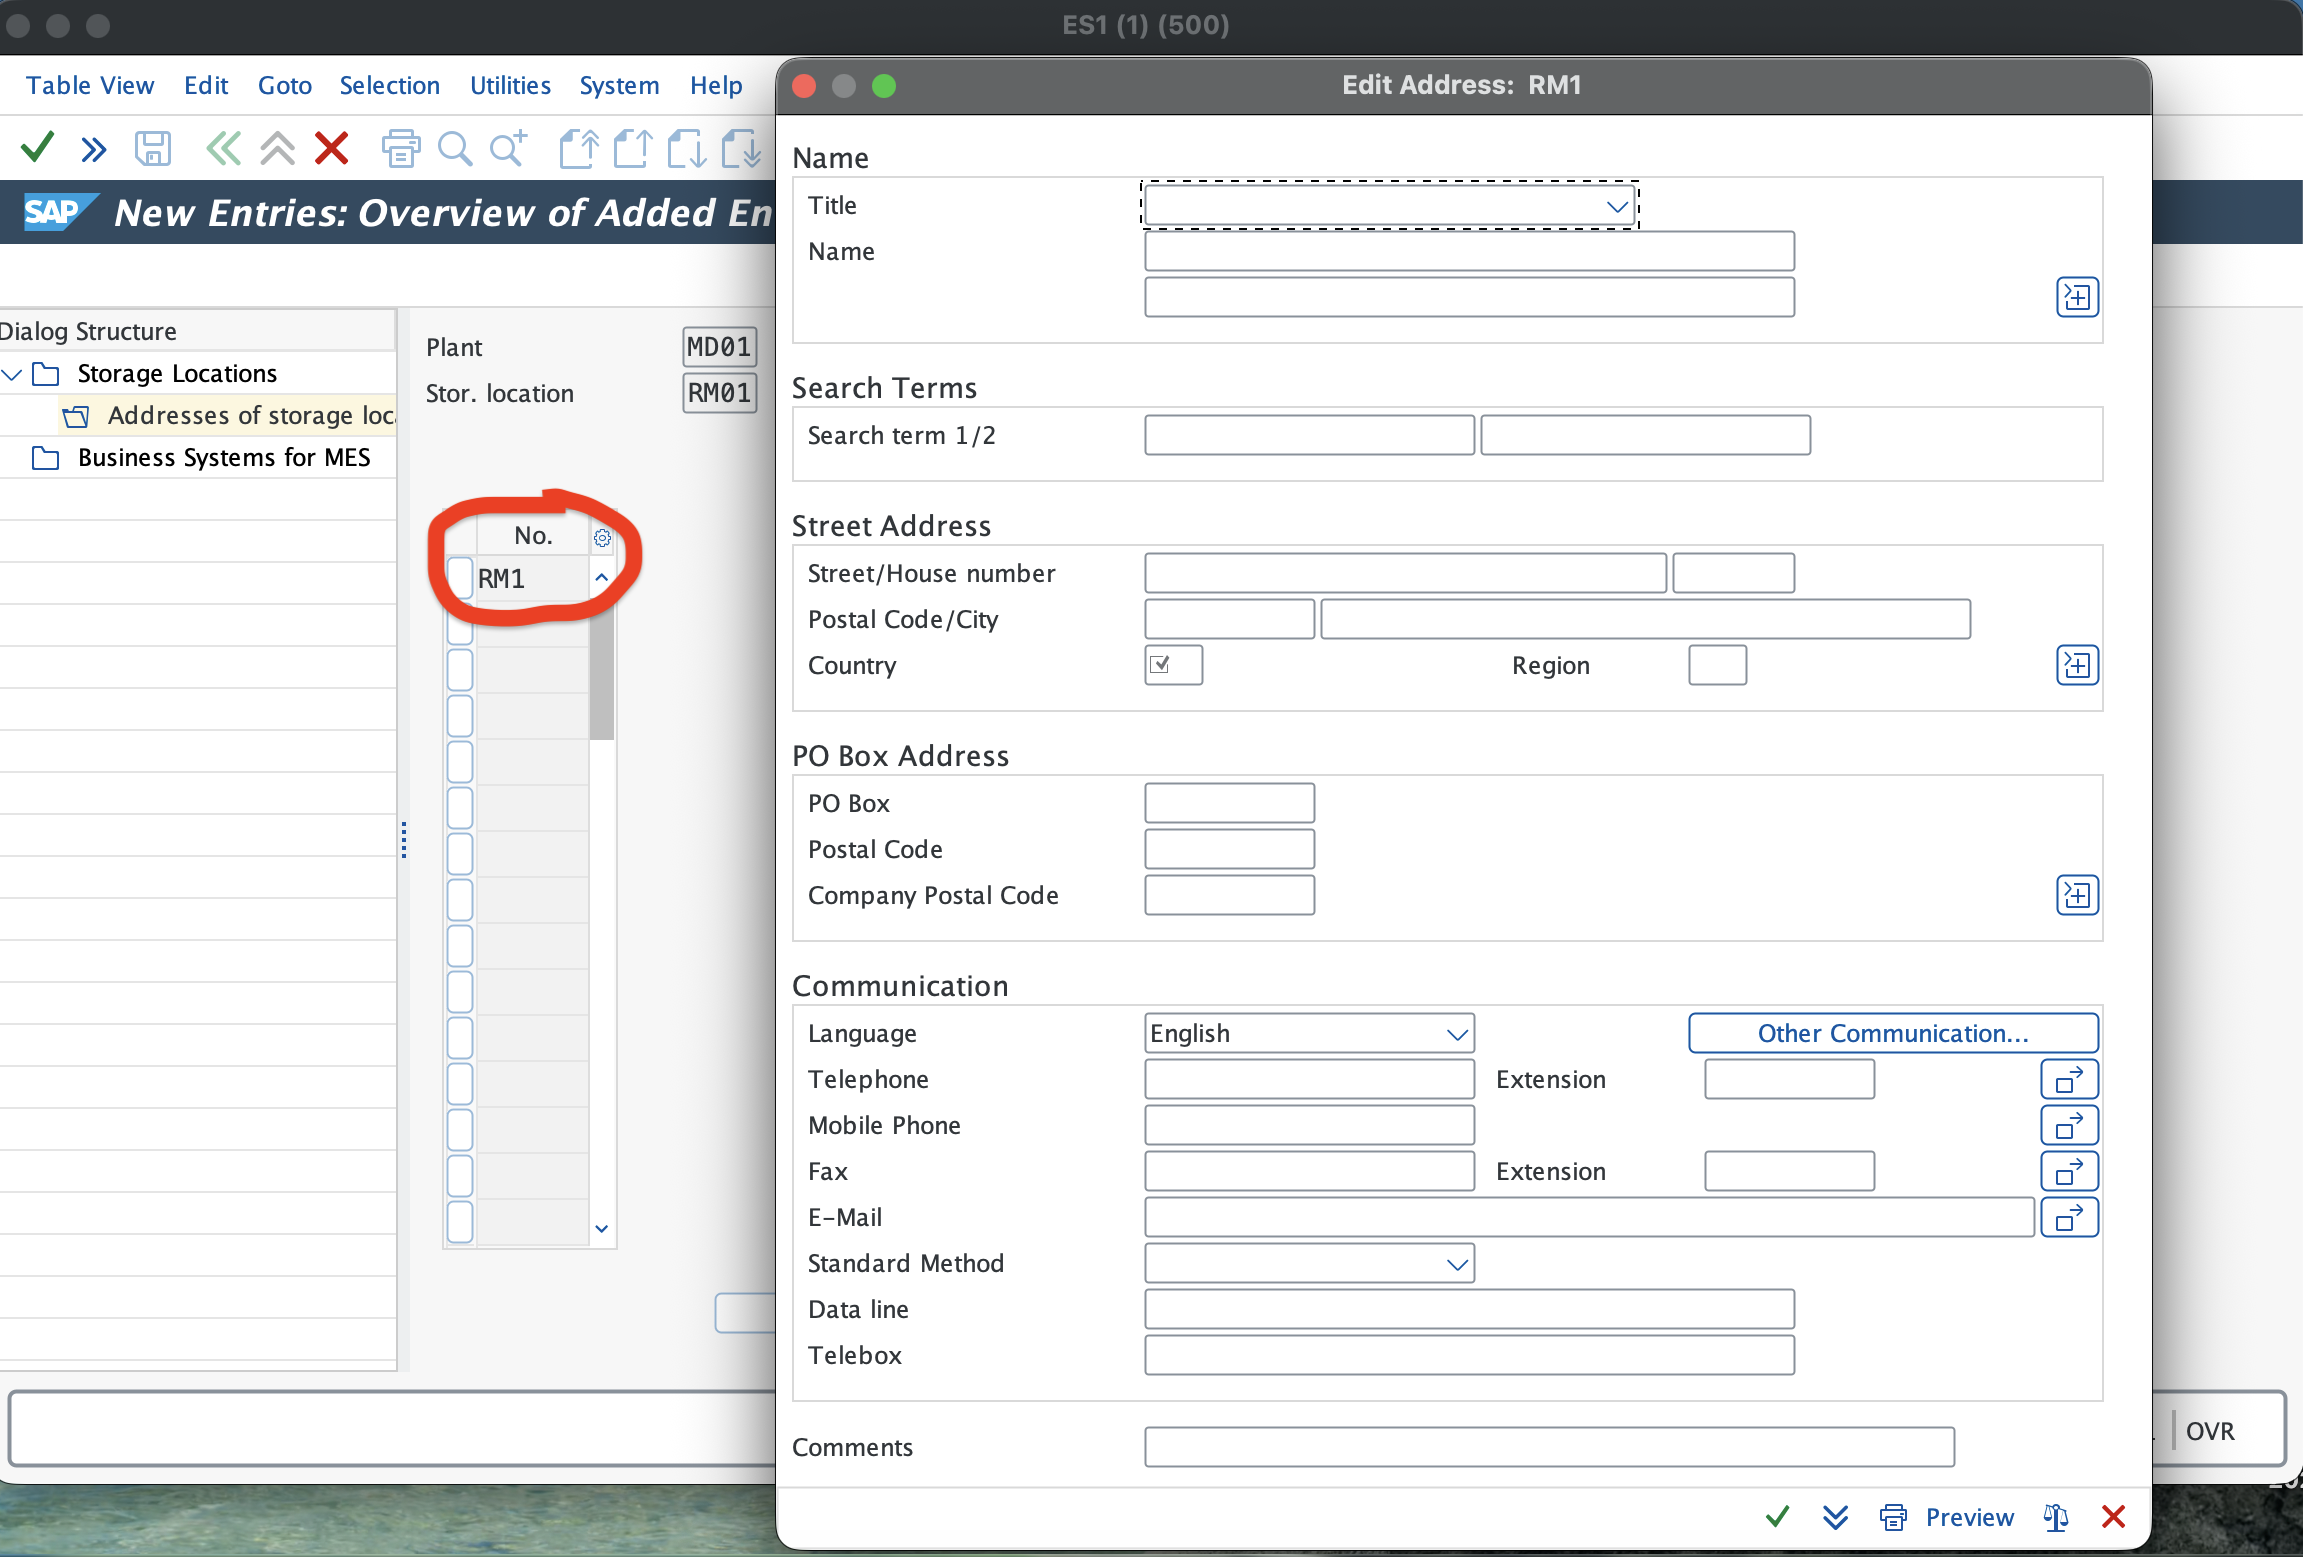
Click on New Entries. The cursor will move to the number column. Enter a 3-character alphanumeric key and press Enter. A pop-up will appear where you can enter address and communication details, just like we did for the plant and company code.
Once done, go back to the storage location overview where we added the three storage locations and press Save at the top. That’s it — your storage locations are now created and linked to the plant.
If you want to view, edit, or delete storage locations assigned to a plant, you can use the same t-code OX09. Enter the plant code and all the details will appear. To delete a storage location, select it and press the delete button. Confirm the pop-up, and it will be removed.
Assignment of Plant to Company Code
This is the final step in creating a plant. Once the plant is created, you need to assign it to a company code. This step is quite straightforward. You can either use t-code OX18 or follow the SAP IMG path: Enterprise Structure → Assignment → Logistics General → Assign Plant to Company Code.
Once you are on that screen, click on New Entries at the top, and you will be directed to this screen.
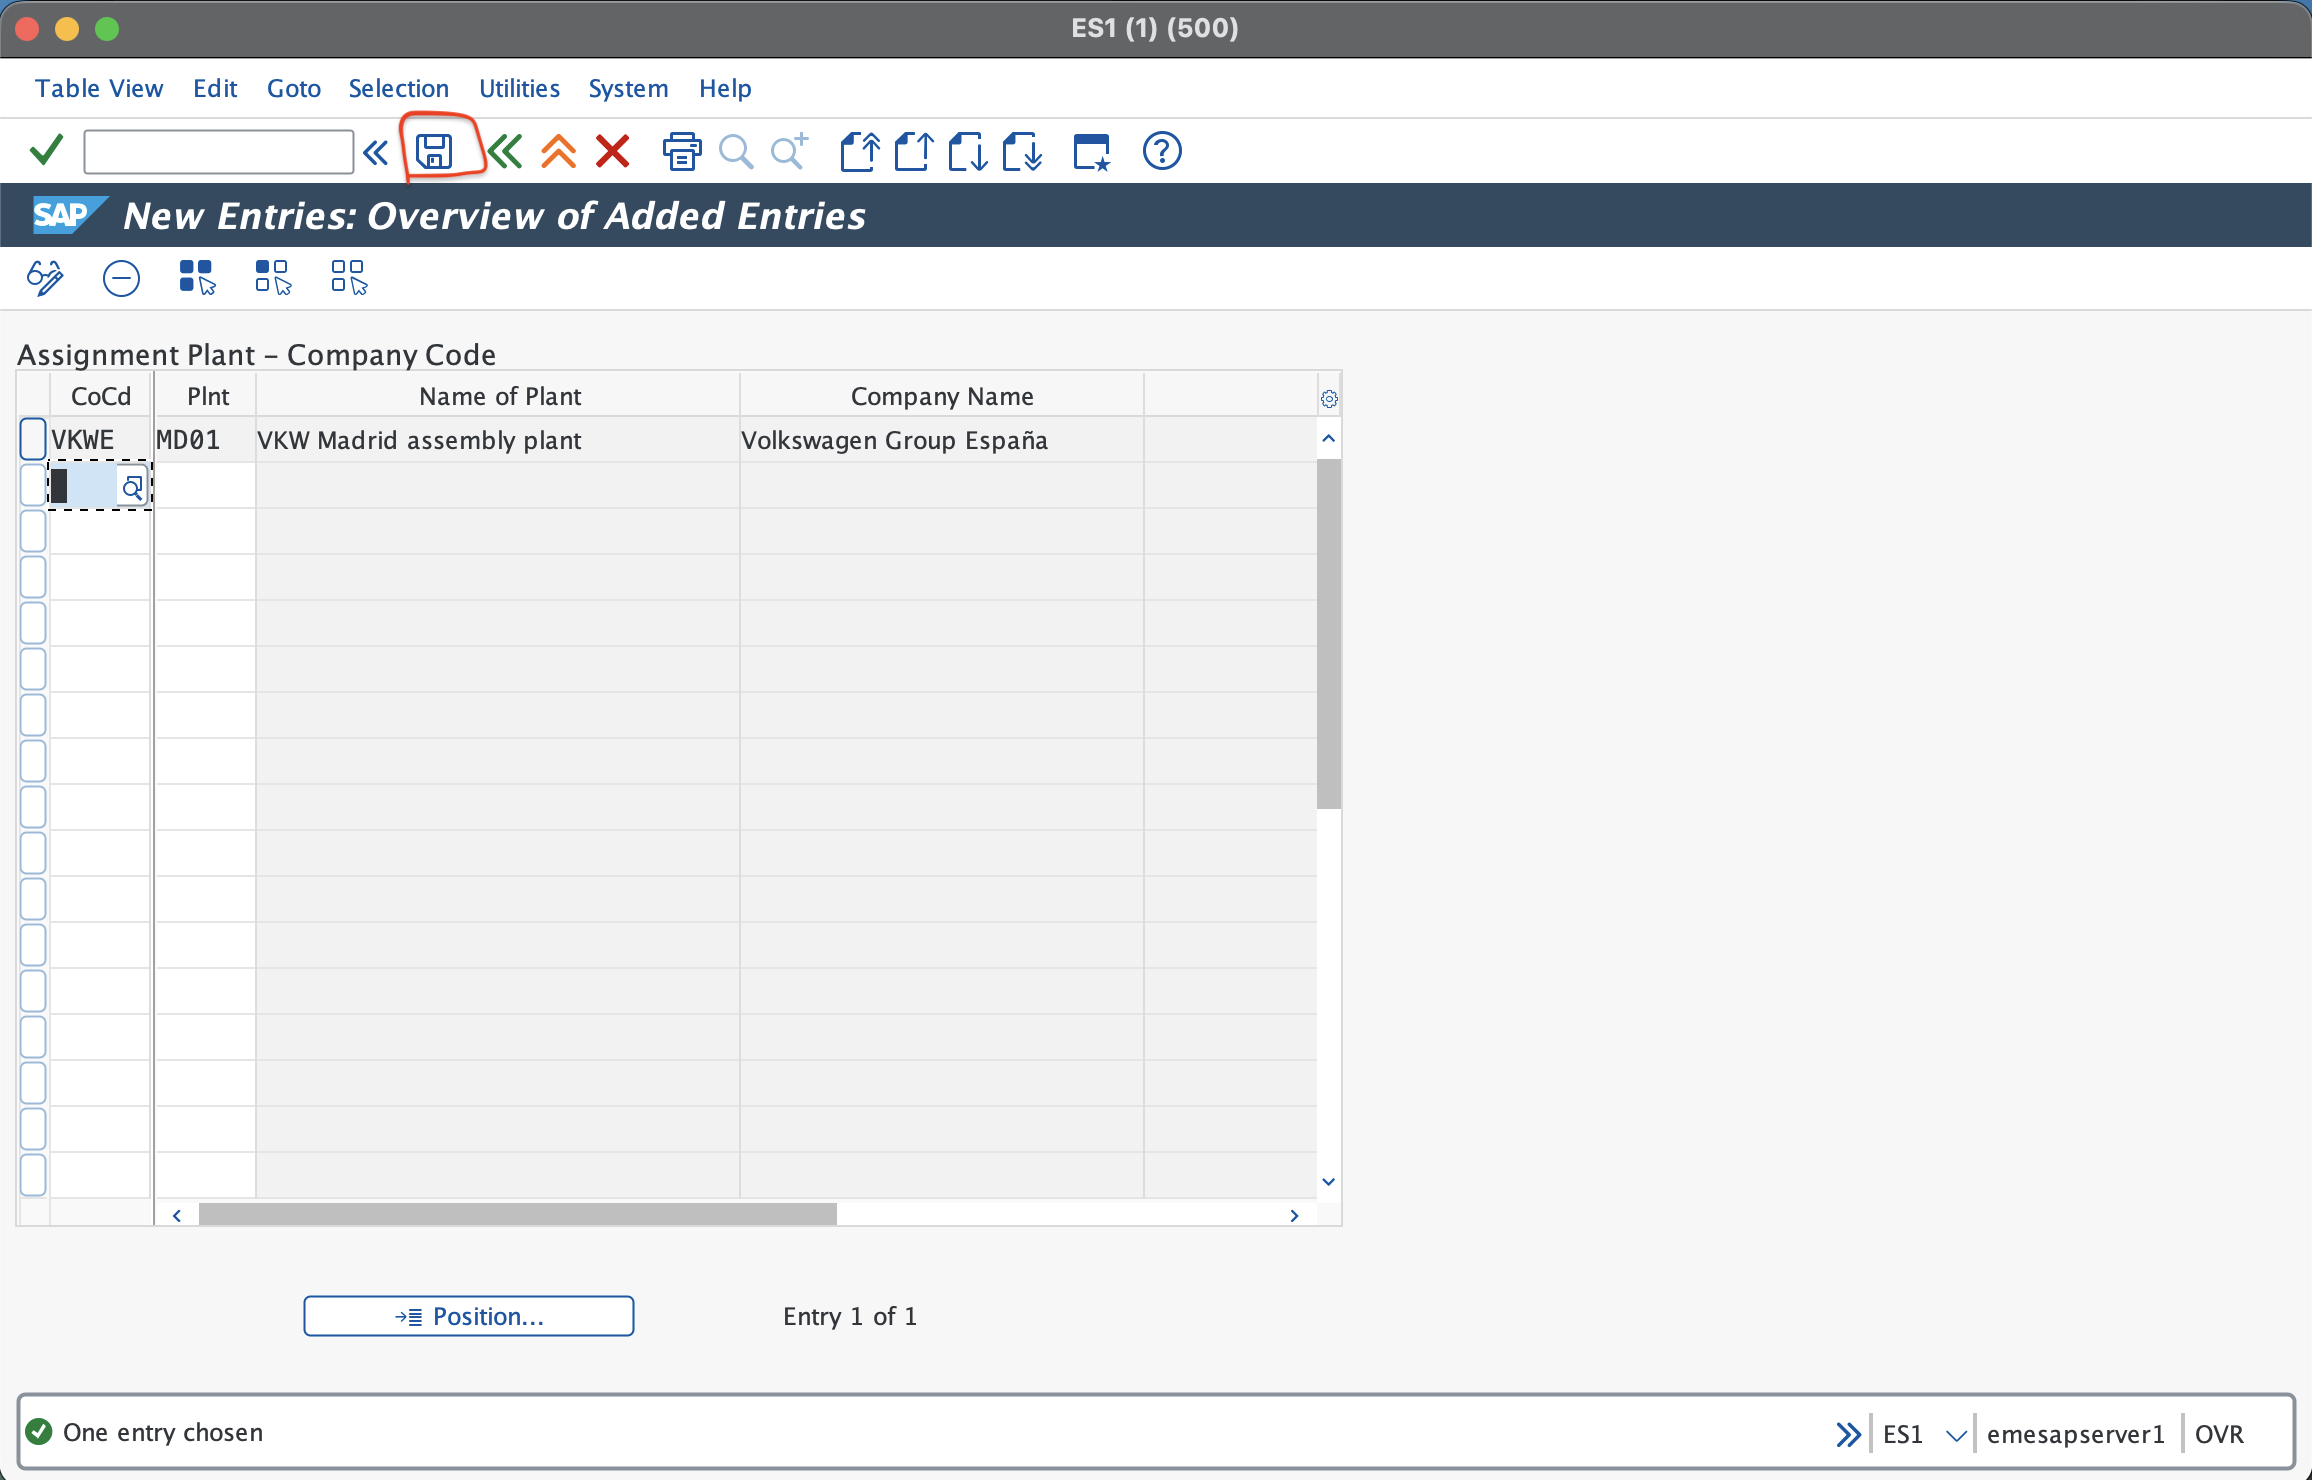
Here, simply enter the company code and plant, then click Save at the top. Now we have created the plant, assigned storage locations, and also assigned the plant to the company code.